6 ‑ tracker bundle unboxing to use
1 - Check the package
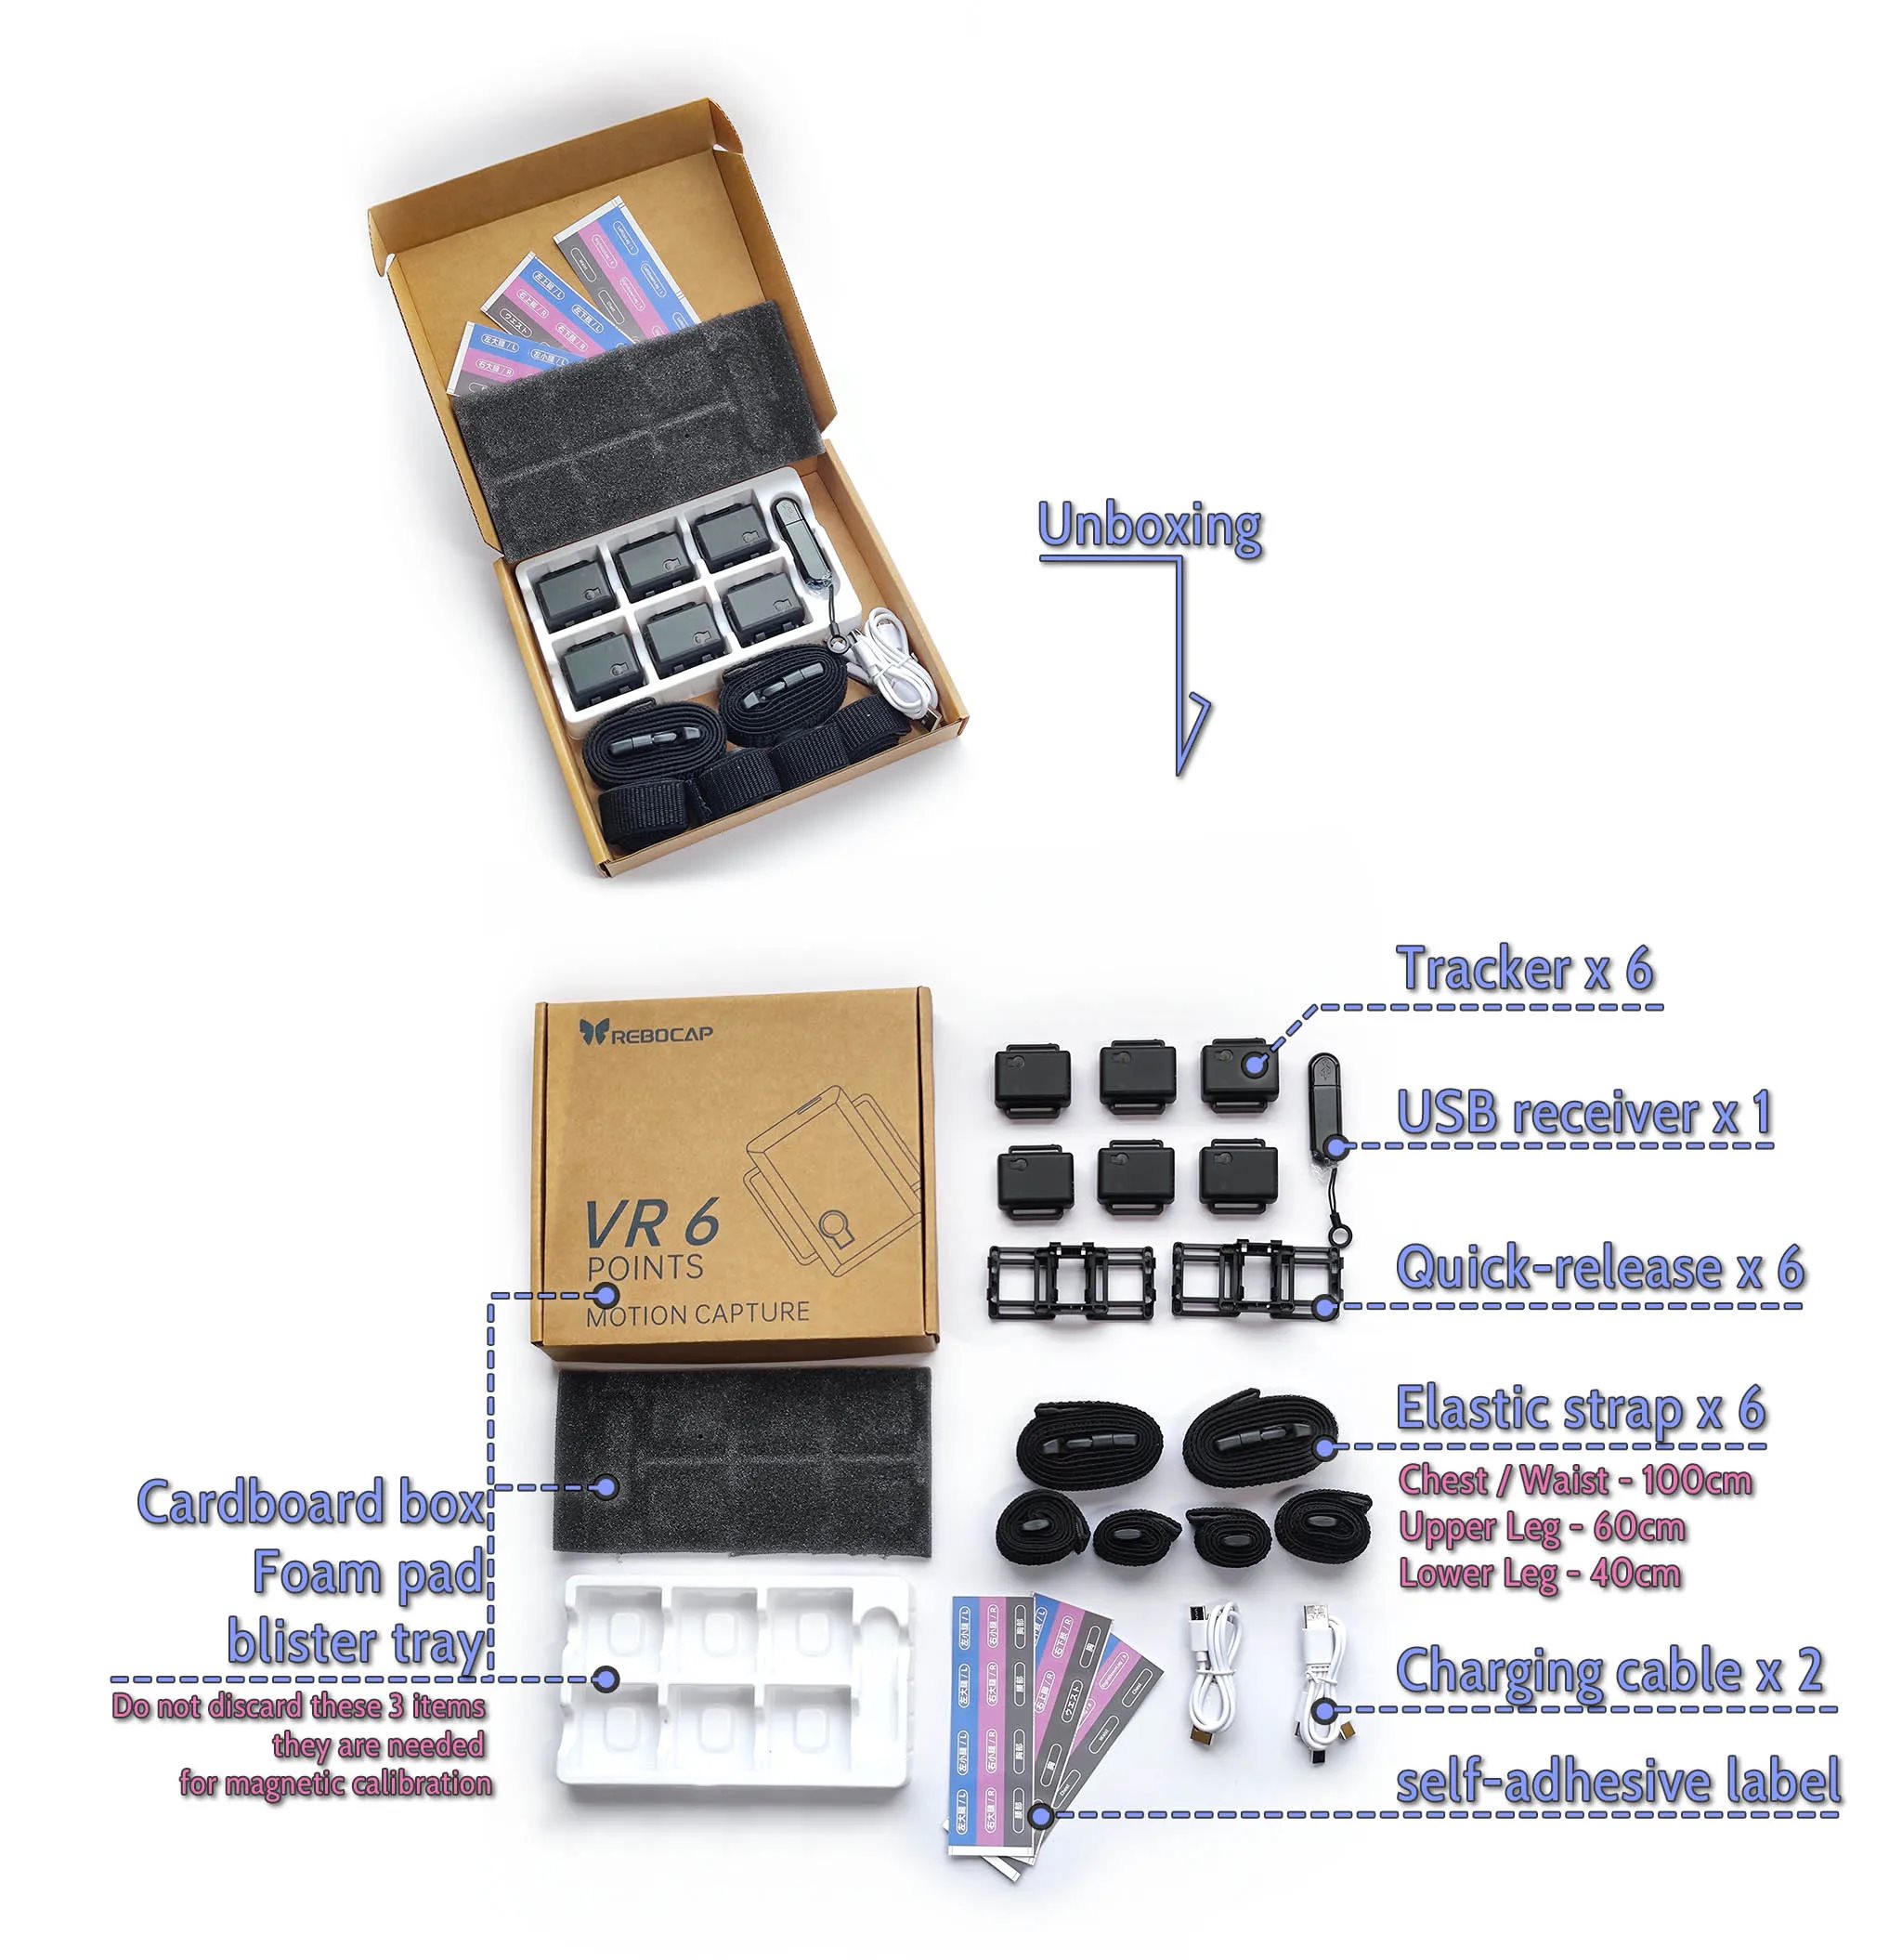
- Cardboard box, Foam pad, Blister Tray
(⚠️ Do not discard these 3 items; they are needed for magnetic calibration.) - Tracker x 6
- USB receiver x 1
- Quick-release base x 6
- Elastic strap x 6
- Chest / Waist - 100cm
- Upper Leg - 60cm
- Lower Leg - 40cm
- Charging cable x 2
- Self-adhesive label (Stickers)
2 - Install straps

prying from one side makes removal easier.
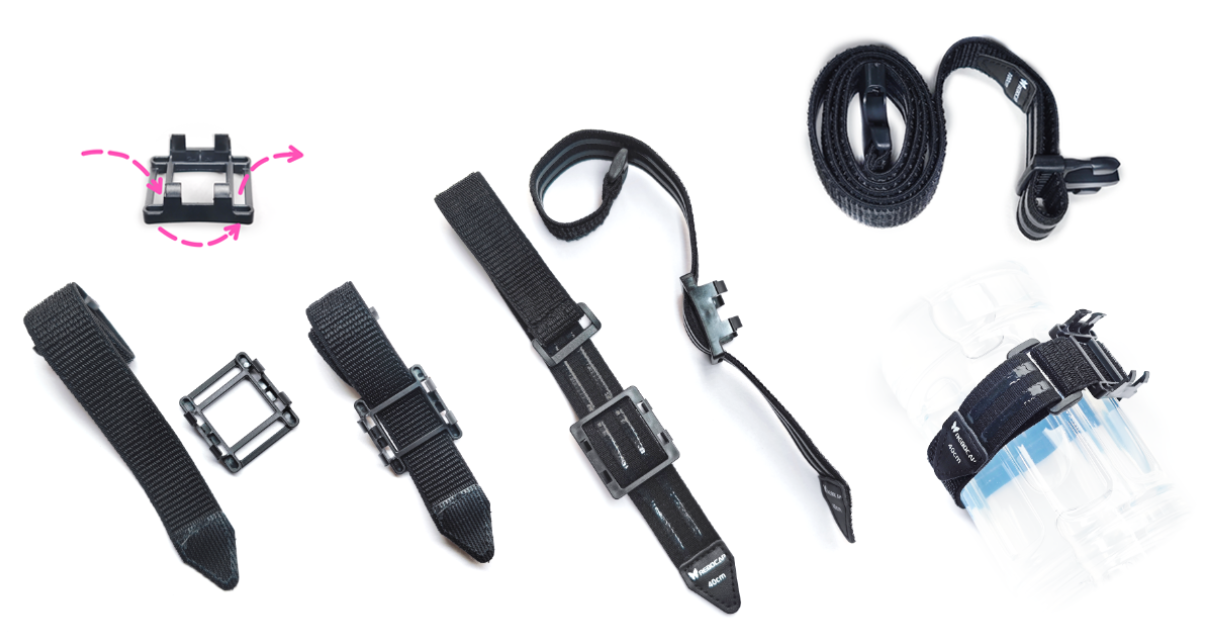
- Attach quick‑release base to strap, ensure strap passes underneath.
-
Strap installation video
-
After attaching Velcro, pull sideways to embed hooks into plush, avoid falling off.
3 - Wear on the body
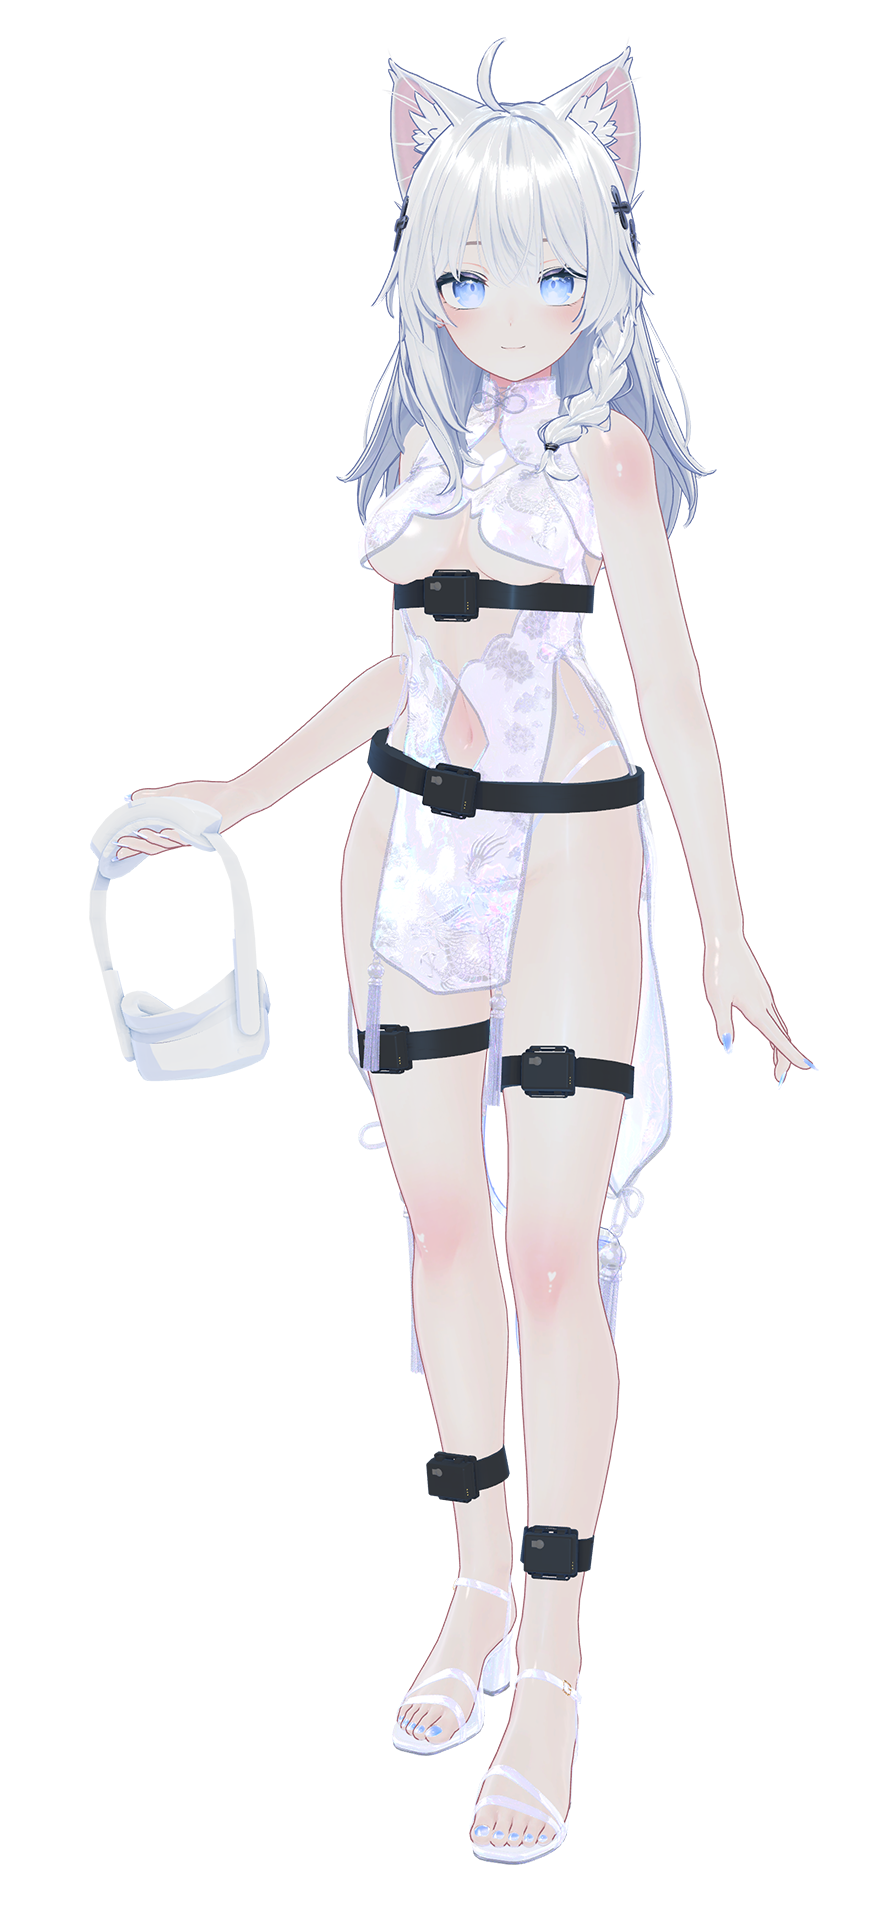
Upper leg: 60 cm
Lower leg: 40 cm
Please refer to the wearing positions shown in the image,
Recommend placing chest/waist tracker on the back,
Leg tracker can be placed on the side.
Keep tracker buttons facing upward.
Do not place waist tracker at the navel to avoid pressure,
Avoid bulging skin areas for leg trackers.
Don't place the thigh tracker too close to the knee.

Factory-set numbers and positions.
Not modifiable or replaceable,
cannot combine two 6‑tracker sets together.
4 - Install software - Check firmware update
A - Install software
- Version selection:
V01 - Suitable for environments with stable magnetic fields, mainly for dancing.
V02 Beta02 - The default switches are optimized for the 6-tracker set,
and it features a new algorithm that actively detects strong sources of interference, maintaining orientation even on a spring bed.
If using V01 version in VR mode, some settings need to be changed.
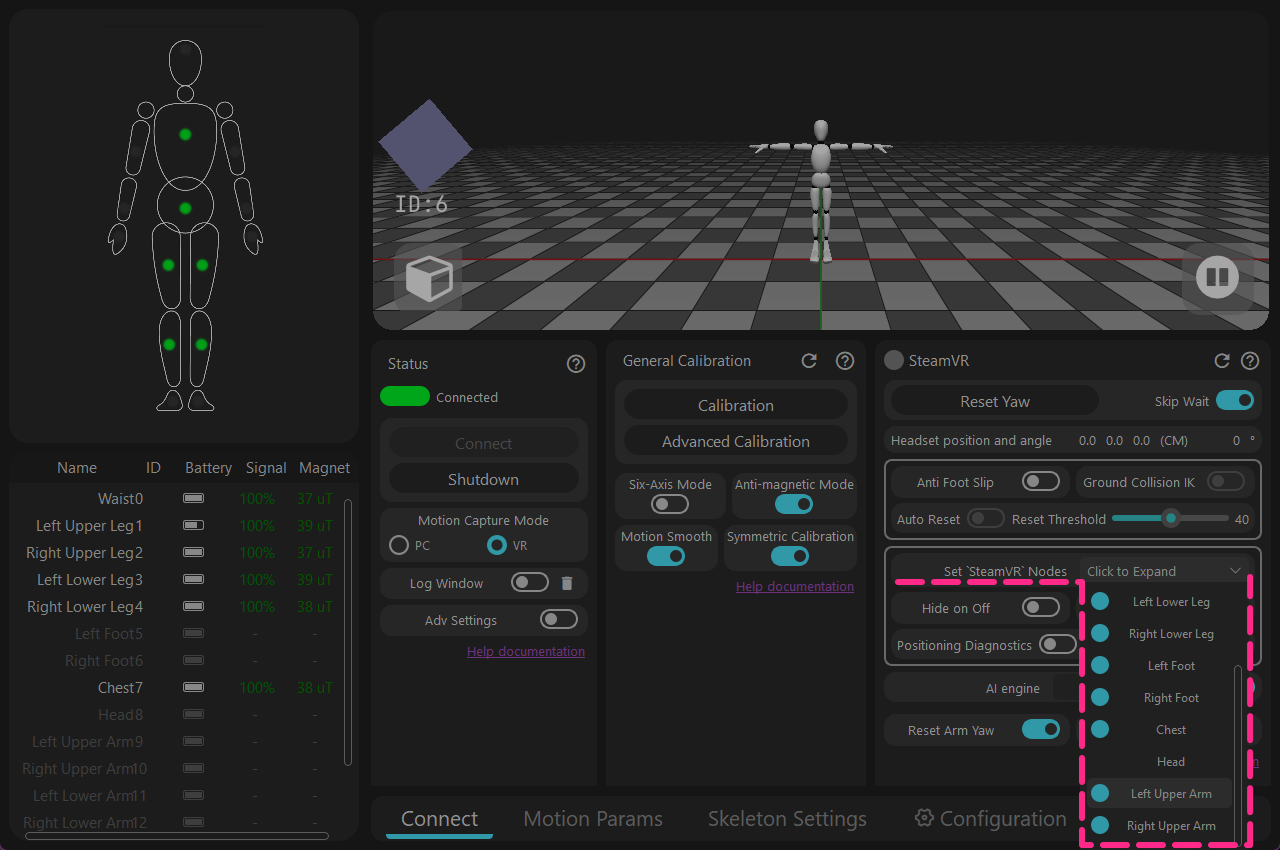
Open [Set 'SteamVR'Nodes] → Turn off [Left/Right Upper Arm]
Details
but it was found that this feature could not auto-check. This has been fixed in the V02 Beta02 software.
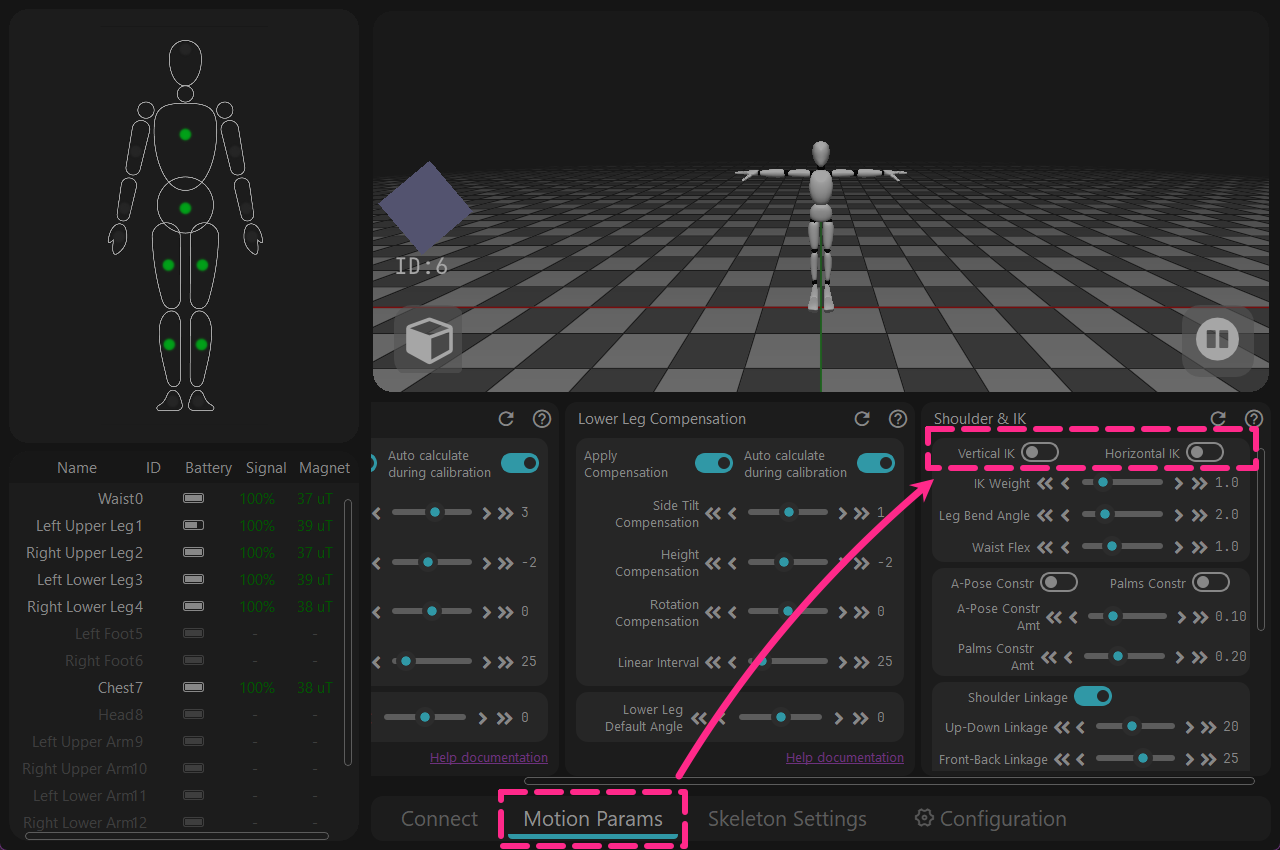
→ [Motion Params] → Turn off [Vertical IK & Horizontal IK]
Details
but it accidentally stayed in a globally active state. This has been fixed in the V02 Beta02 software.
- Recommended install on a non‑system drive (not C:).
B - Connect to computer
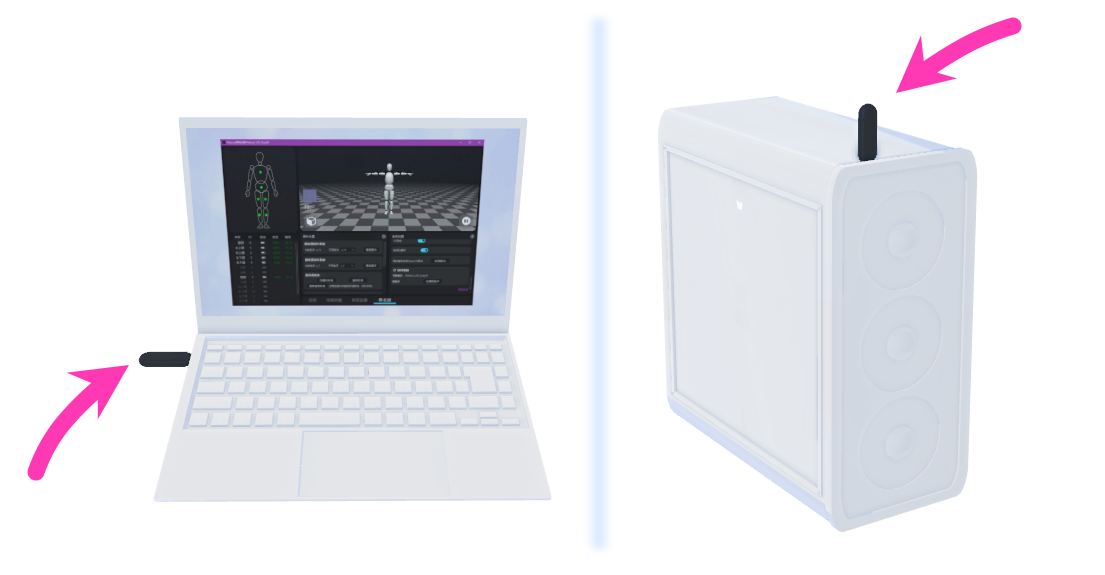
- Insert USB receiver into computer, choose an open surrounding port.
- Or prepare a common USB 3.0 data cable as an extension.
- If tracker signal cannot maintain 100%, consider using an extension cable or changing its position.
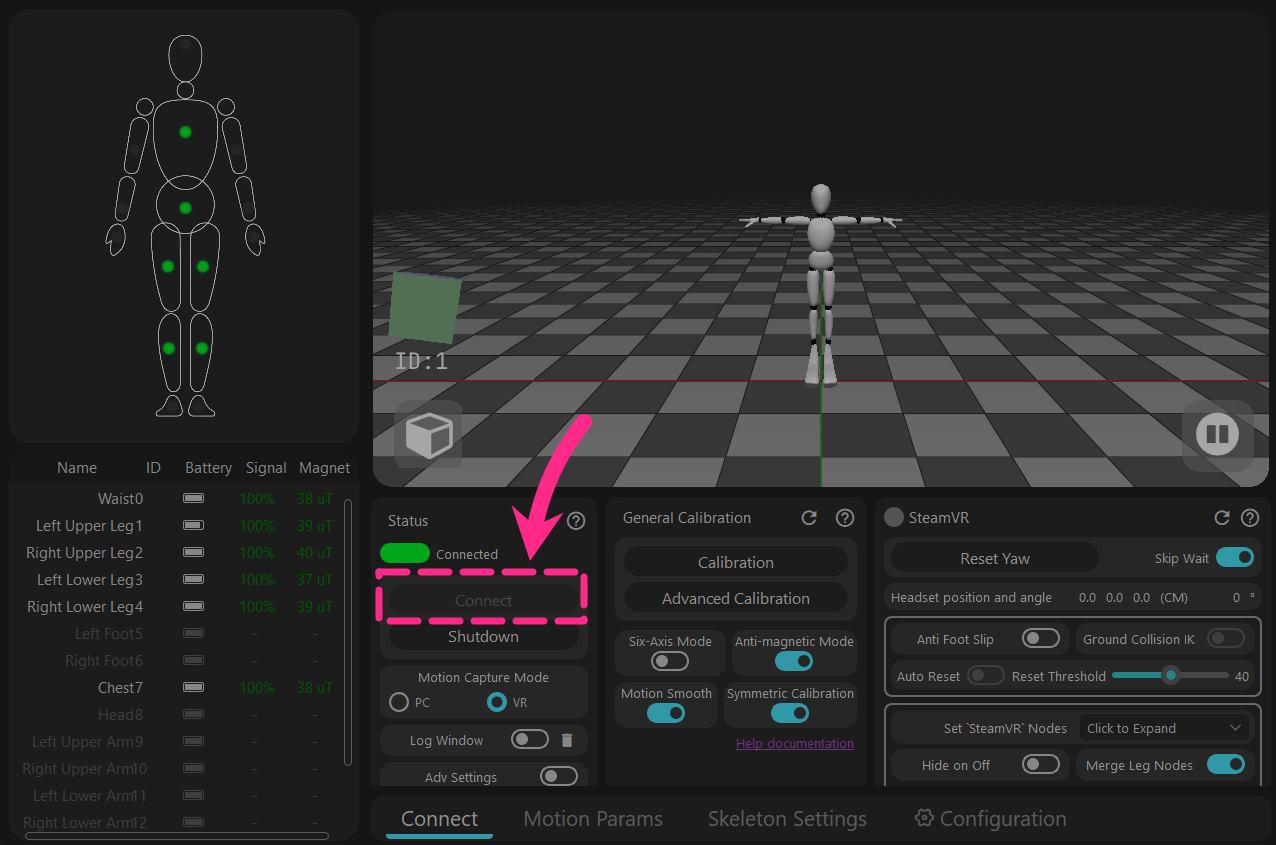
- Click "Connect" in software (After beta02 version, it will auto connect).

- Press tracker button to power on.
- Note: Trackers are powered off via the software.
C - Check firmware
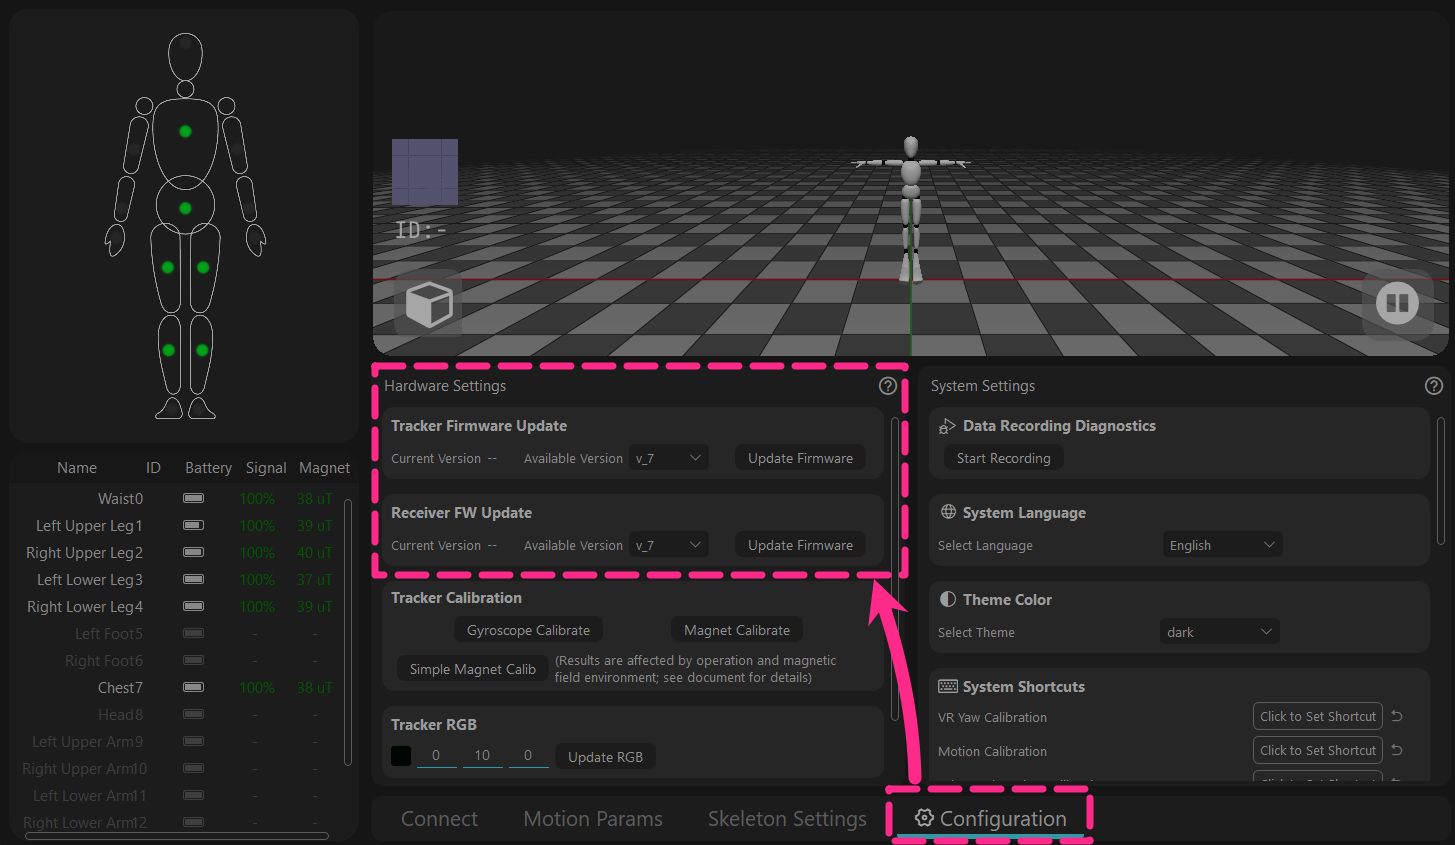
- to the highest version available in options,
- will change with future software updates.
- Firmware is bundled with the software package, not updated via the internet.
Check the firmware version supported by the software.
When switching back to an older software version, you need to downgrade the firmware accordingly.
release_v01 - ◼️tracker : V6 / V7 , 📡receiver : V6 / V7
release_v02 beta02 - ◼️tracker : V15 , 📡receiver : V6 / V7
(not public) release_v02 beta02.1 - ◼️tracker : V16 , 📡receiver : V8
-
Open the log window to see each tracker actual firmware version
(the log window is located under "Connect & Power Off" in the software). -
The trackers are updated wirelessly 📶 — no USB cable is needed.
🚫 Do not update the tracker and receiver at the same time. -
If the update fails, need restart the tracker and click update again.
🟩Green – fast blink: Tracker working normally
🟩Green – slow blink: Tracker waiting for receiver signal
🟦Blue: Tracker is receiving firmware data
🟨Yellow: Update failed (manually press the 🔘 button to restart, then retry the update)
⬜White: Update successful (usually auto‑restarts after 10s; if not, restart manually) -
When 📡receiver update done, unplug and replug the USB, and 🔄restart the software.
5 -Calibrate tracker initial data
Gyroscope Calibration

- Place trackers on the floor
(in a position with no physical shaking/movement).
- No need to put them back in the Blister Tray.
- The principle is to record a few seconds of no physical movement in reality.
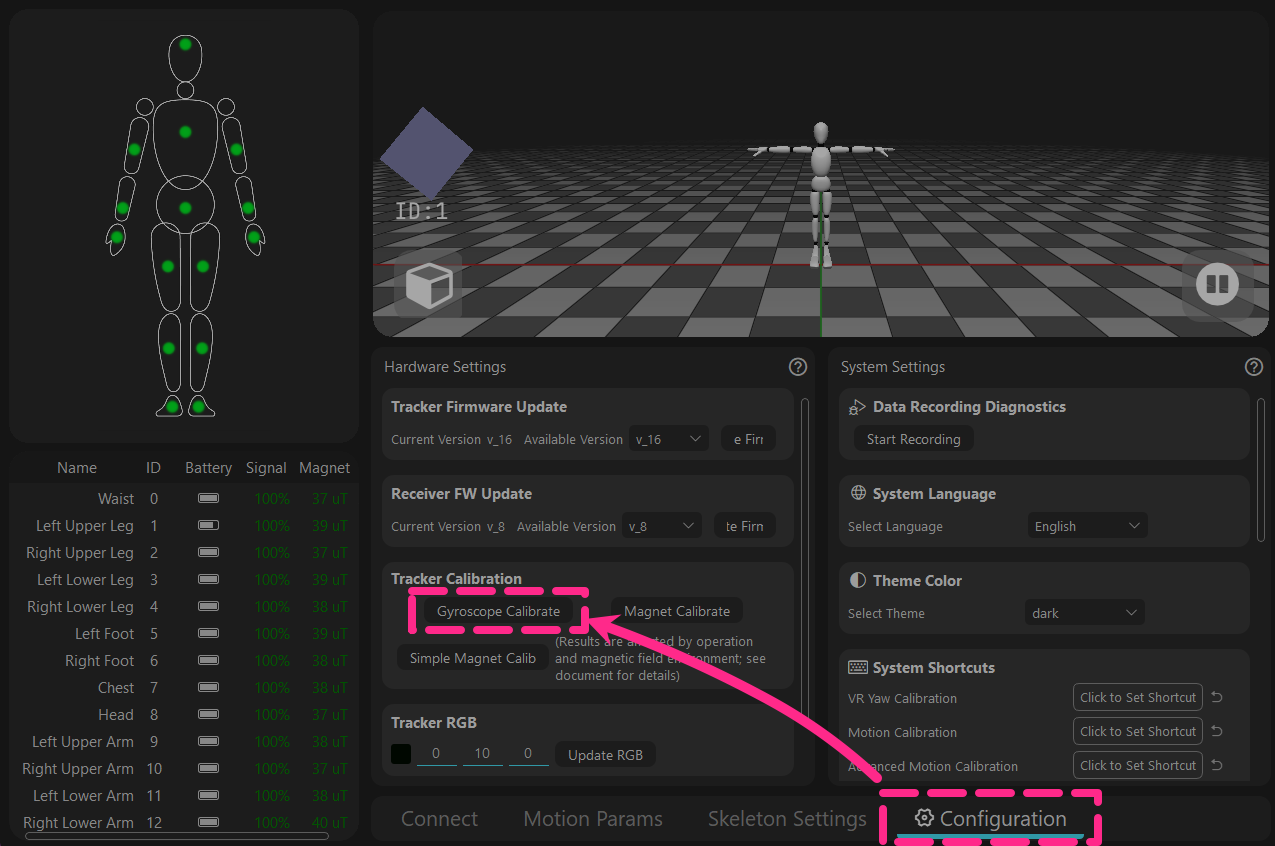
- Click the button, wait for collection to complete.
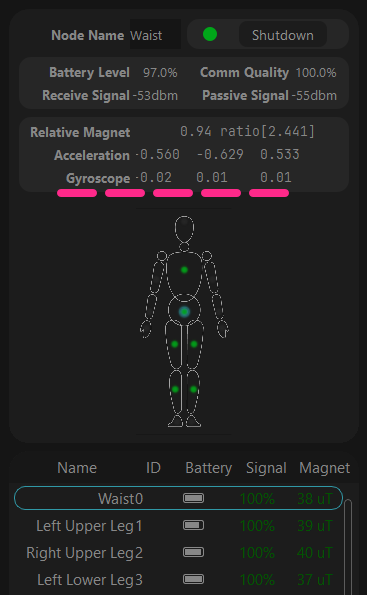
- 🔍Once completed, check the gyroscope information of each tracker.
- Typically, the gyroscope output values should be 0 to ±0.05 when static.
Magnetic Field Calibration
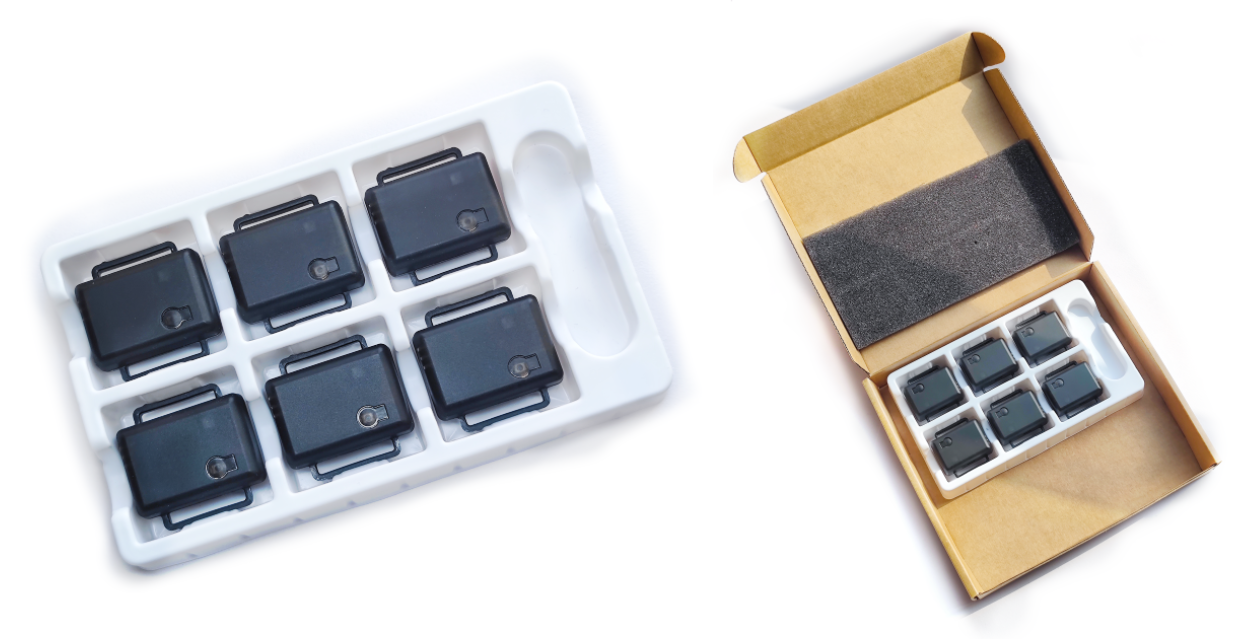
- Place trackers in the Blister Tray in a uniform direction.
- (If you find it inconvenient to hold, you can put the Blister Tray back inside the cardboard box).
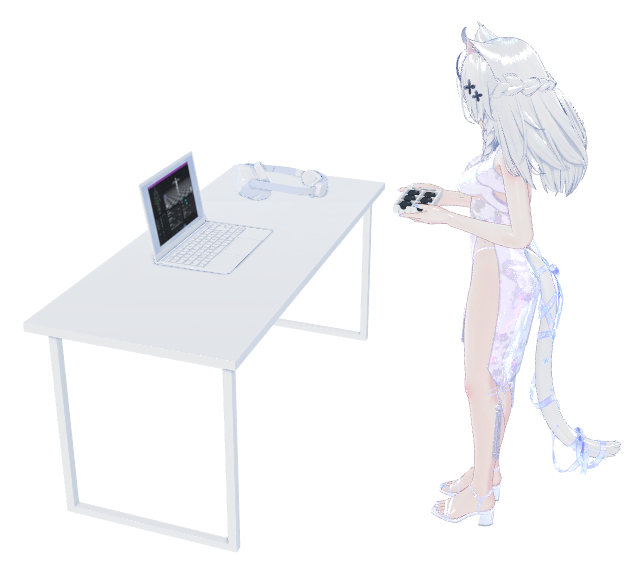
- Hold it in your arms, stand in the center of the play area,
- or one step away from the edge of the computer desk.
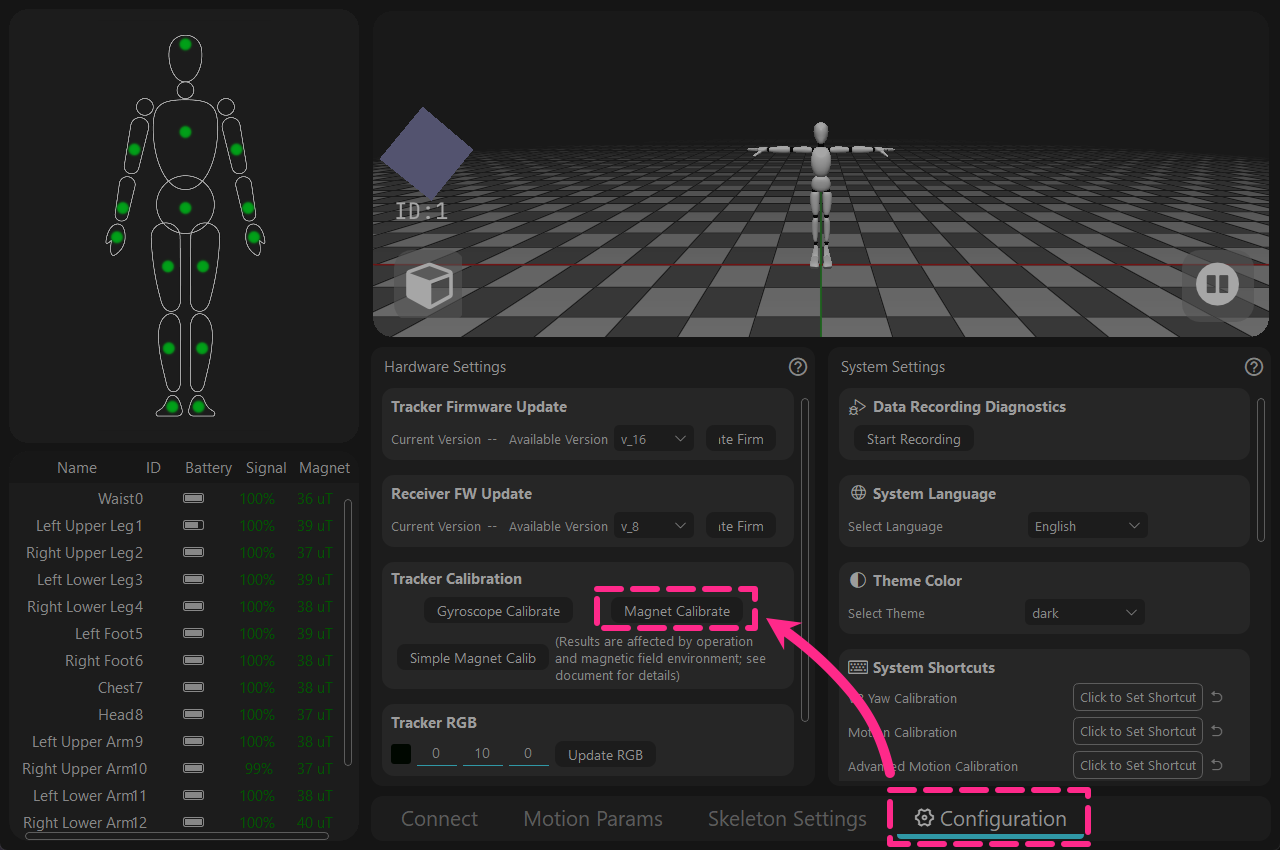
- Click the software button and follow the animation sequence displayed by the software to rotate at a constant speed.
- (The recording process captures data for two full turns per side).
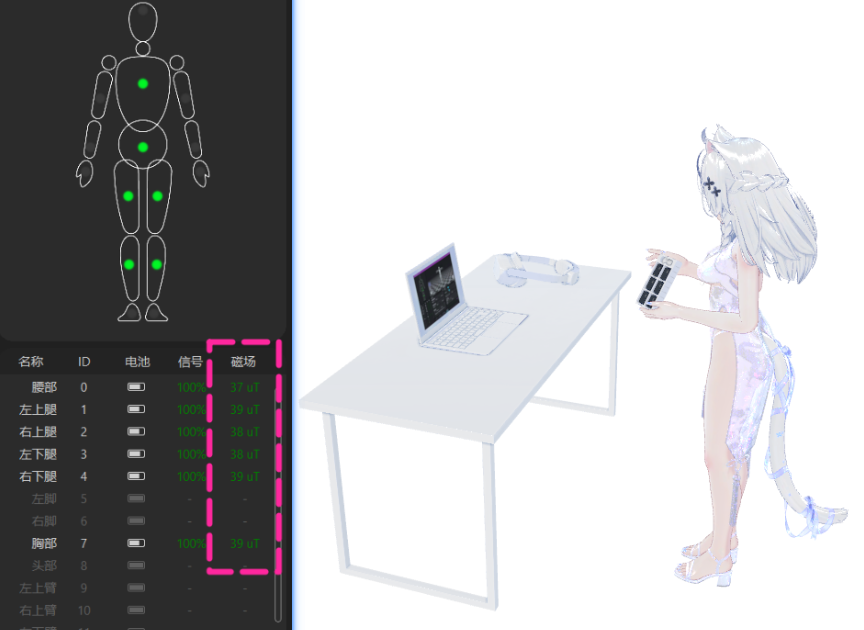
- Once completed, randomly flip the Blister Tray in your hands,
- 🔍check if the calibrated tracker magnetic field readings are consistent or close to each other,
- ⚠️if the magnetic field readings differ significantly from each other, you need to perform magnetic calibration again.
What if you don't have/lost the box?.
You can use the straps to attach the trackers to a square water bottle or a tissue box,
grouping them in sets of 2–3.
Simple magnetic calibration.
As a convenient alternative.
Main action:
Rotate the tracker during the recording period, covering as many directions as possible (360° full‑range flips).
Tip:
Move your wrist and arm in a figure‑8 pattern so the sensor can capture magnetic field data from more angles.
Is this button not visible in V01 and older versions?
This button is not shown in older versions by default ,
you need to manually create a specific .txt file to make it appear.
Go to the Rebocap root folder (where Rebocap.exe is located),
create a new .txt file, and rename it to
_simple_cal_
After restarting the software, the button will appear.
6 - Enter SteamVR
Connection

- Launch SteamVR.
- (SteamVR headset = Rebocap head tracker).
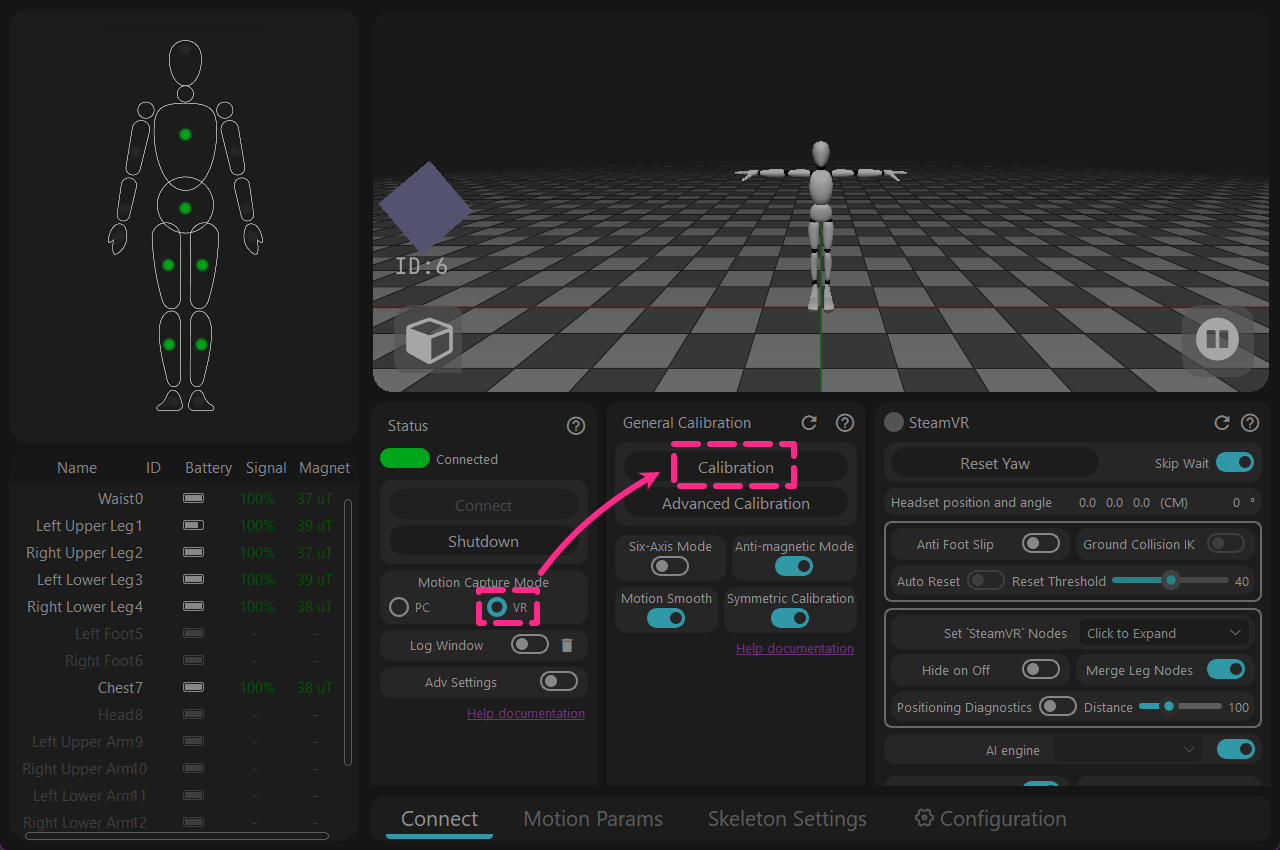
- In Rebocap, select [VR Mode], then click "Calibrate".
- Calibrate while SteamVR is running to ensure a successful connection.
- To enter game, just repeat this step
- Rebocap ID +3 = Ssteamvr ID
VR – Calibration Posture Guide
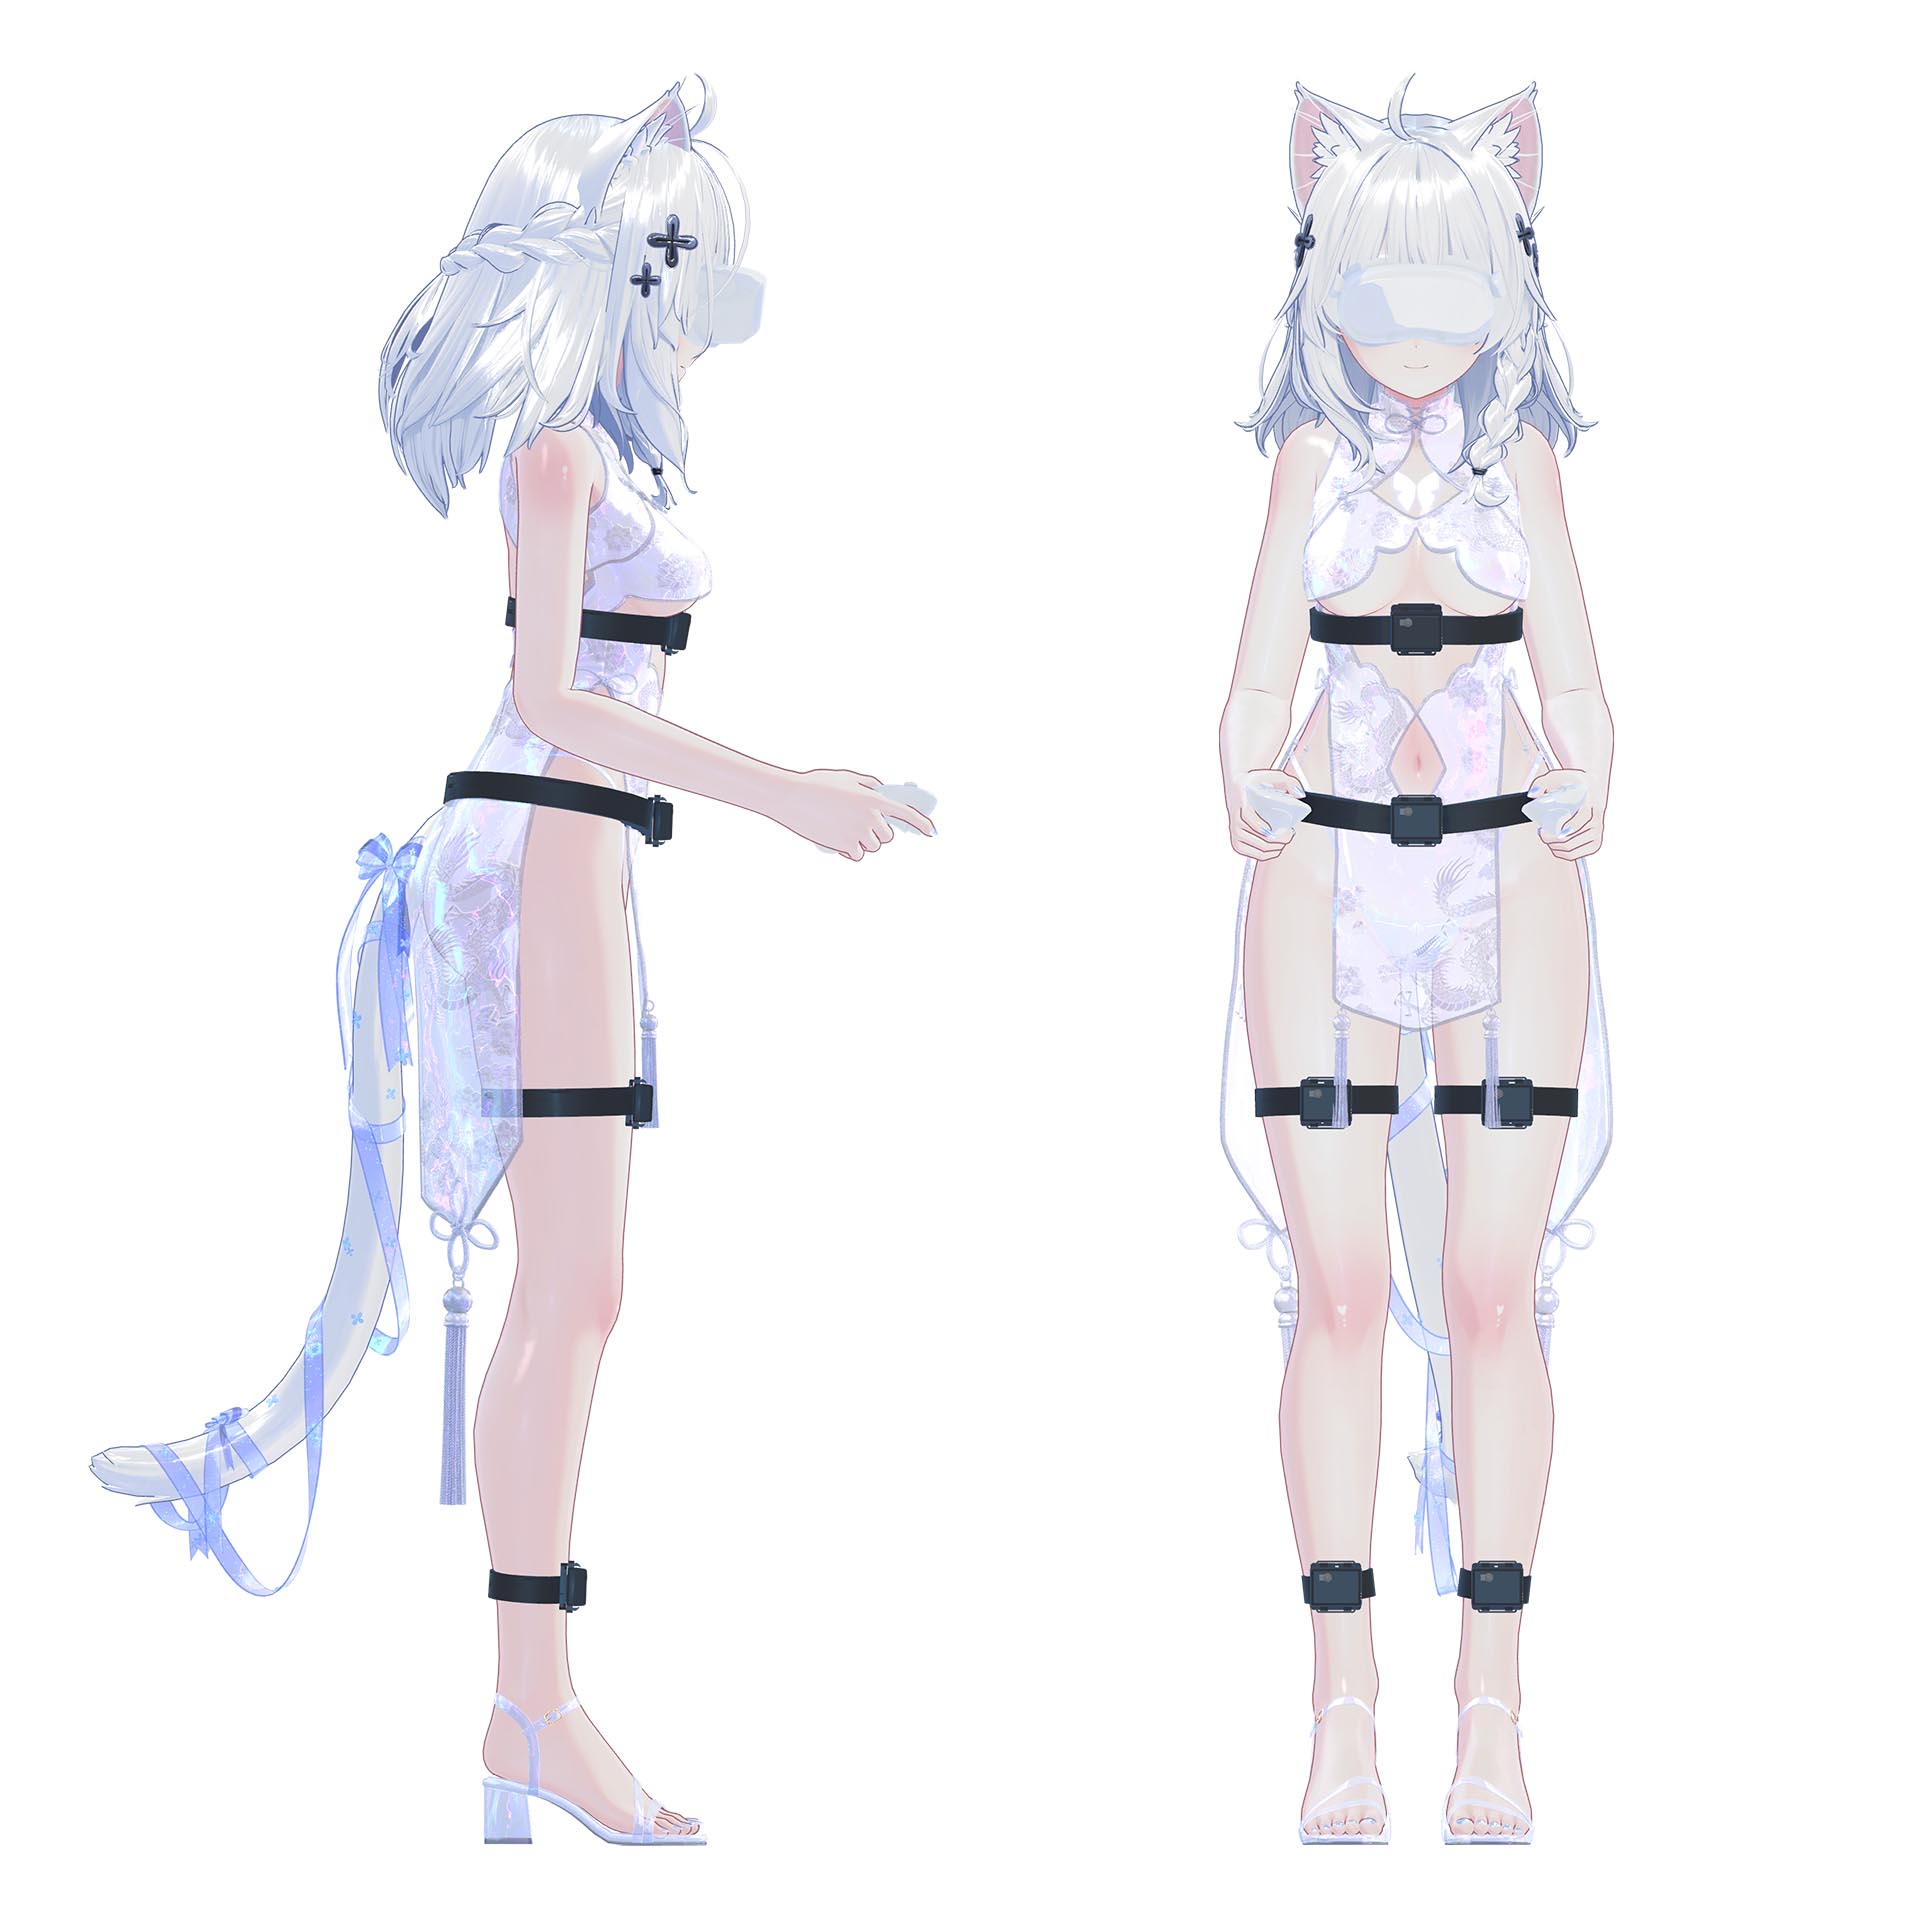
- Raise VR controller to avoid tracker capturing magnets in controller.
- Keep proper foot spacing, neither too close nor too wide, similar to the image.
- Stand naturally and relaxed without tensing your muscles.
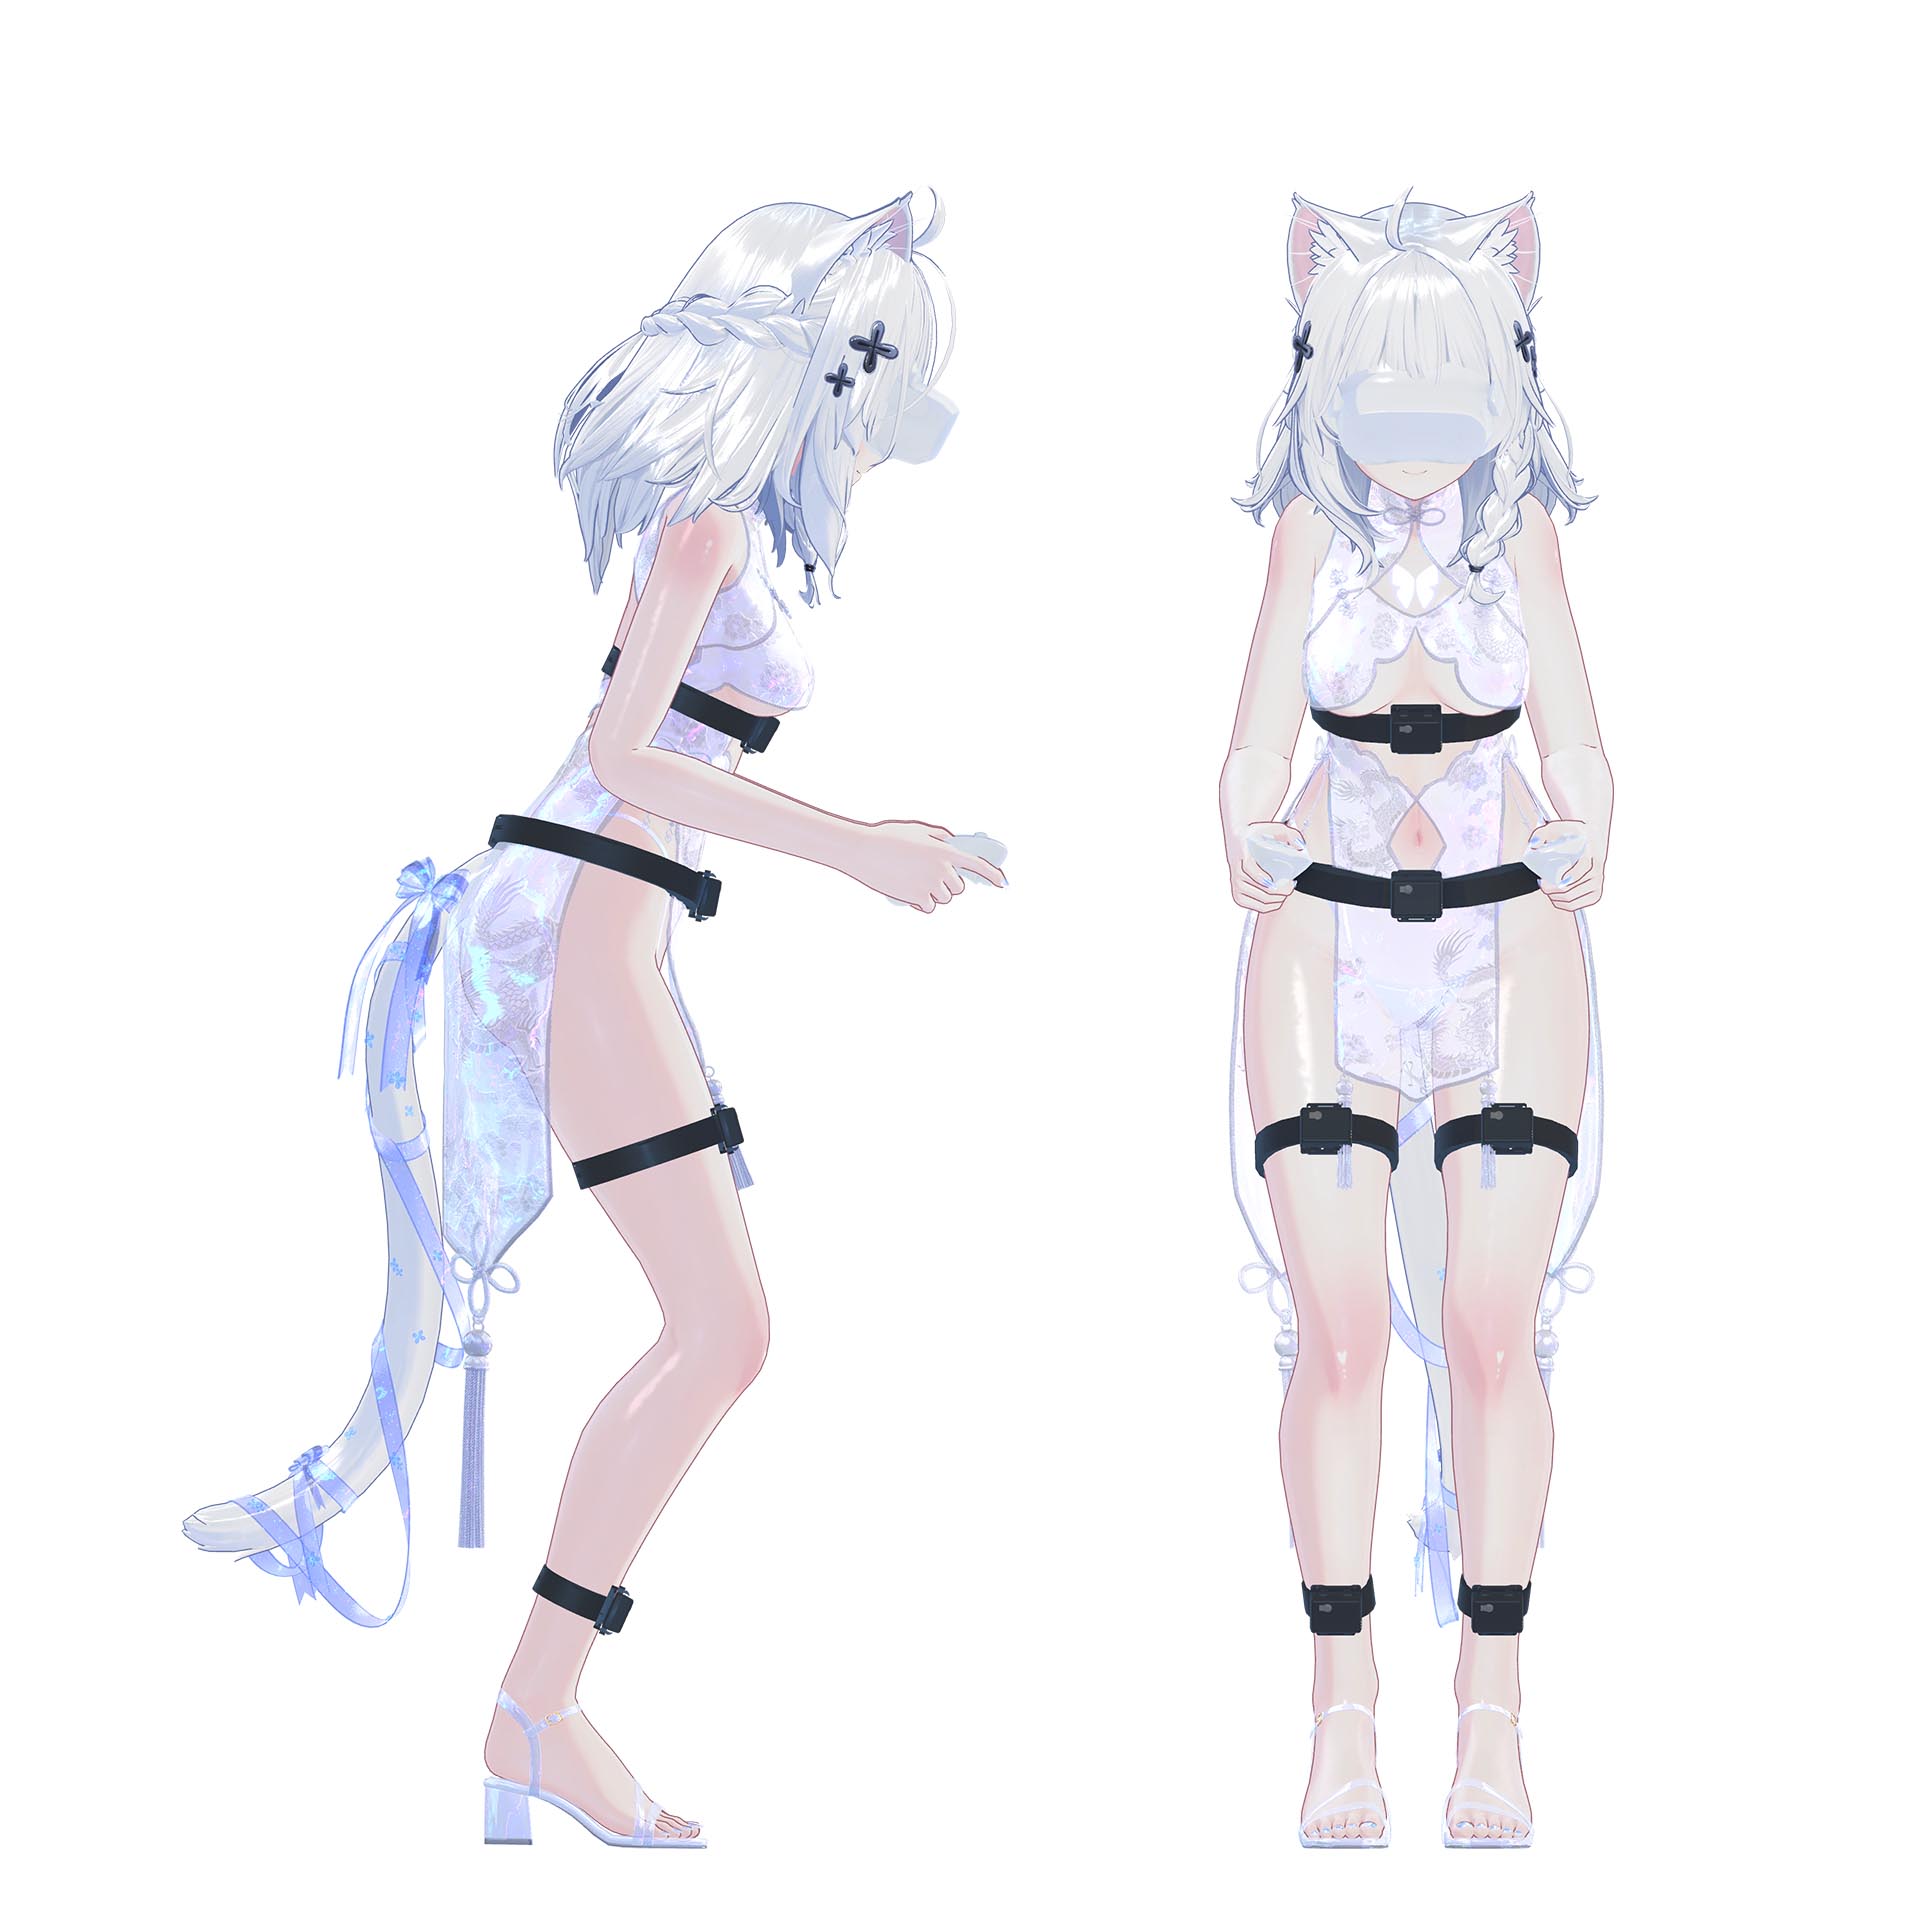
- Half squat + bend waist and lower head, so that the tracker can determine the forward direction of the body through the tilt angle.
- If bending is difficult or unclear, you can use Advanced Calibration.
- Keep legs balanced + knee spacing.
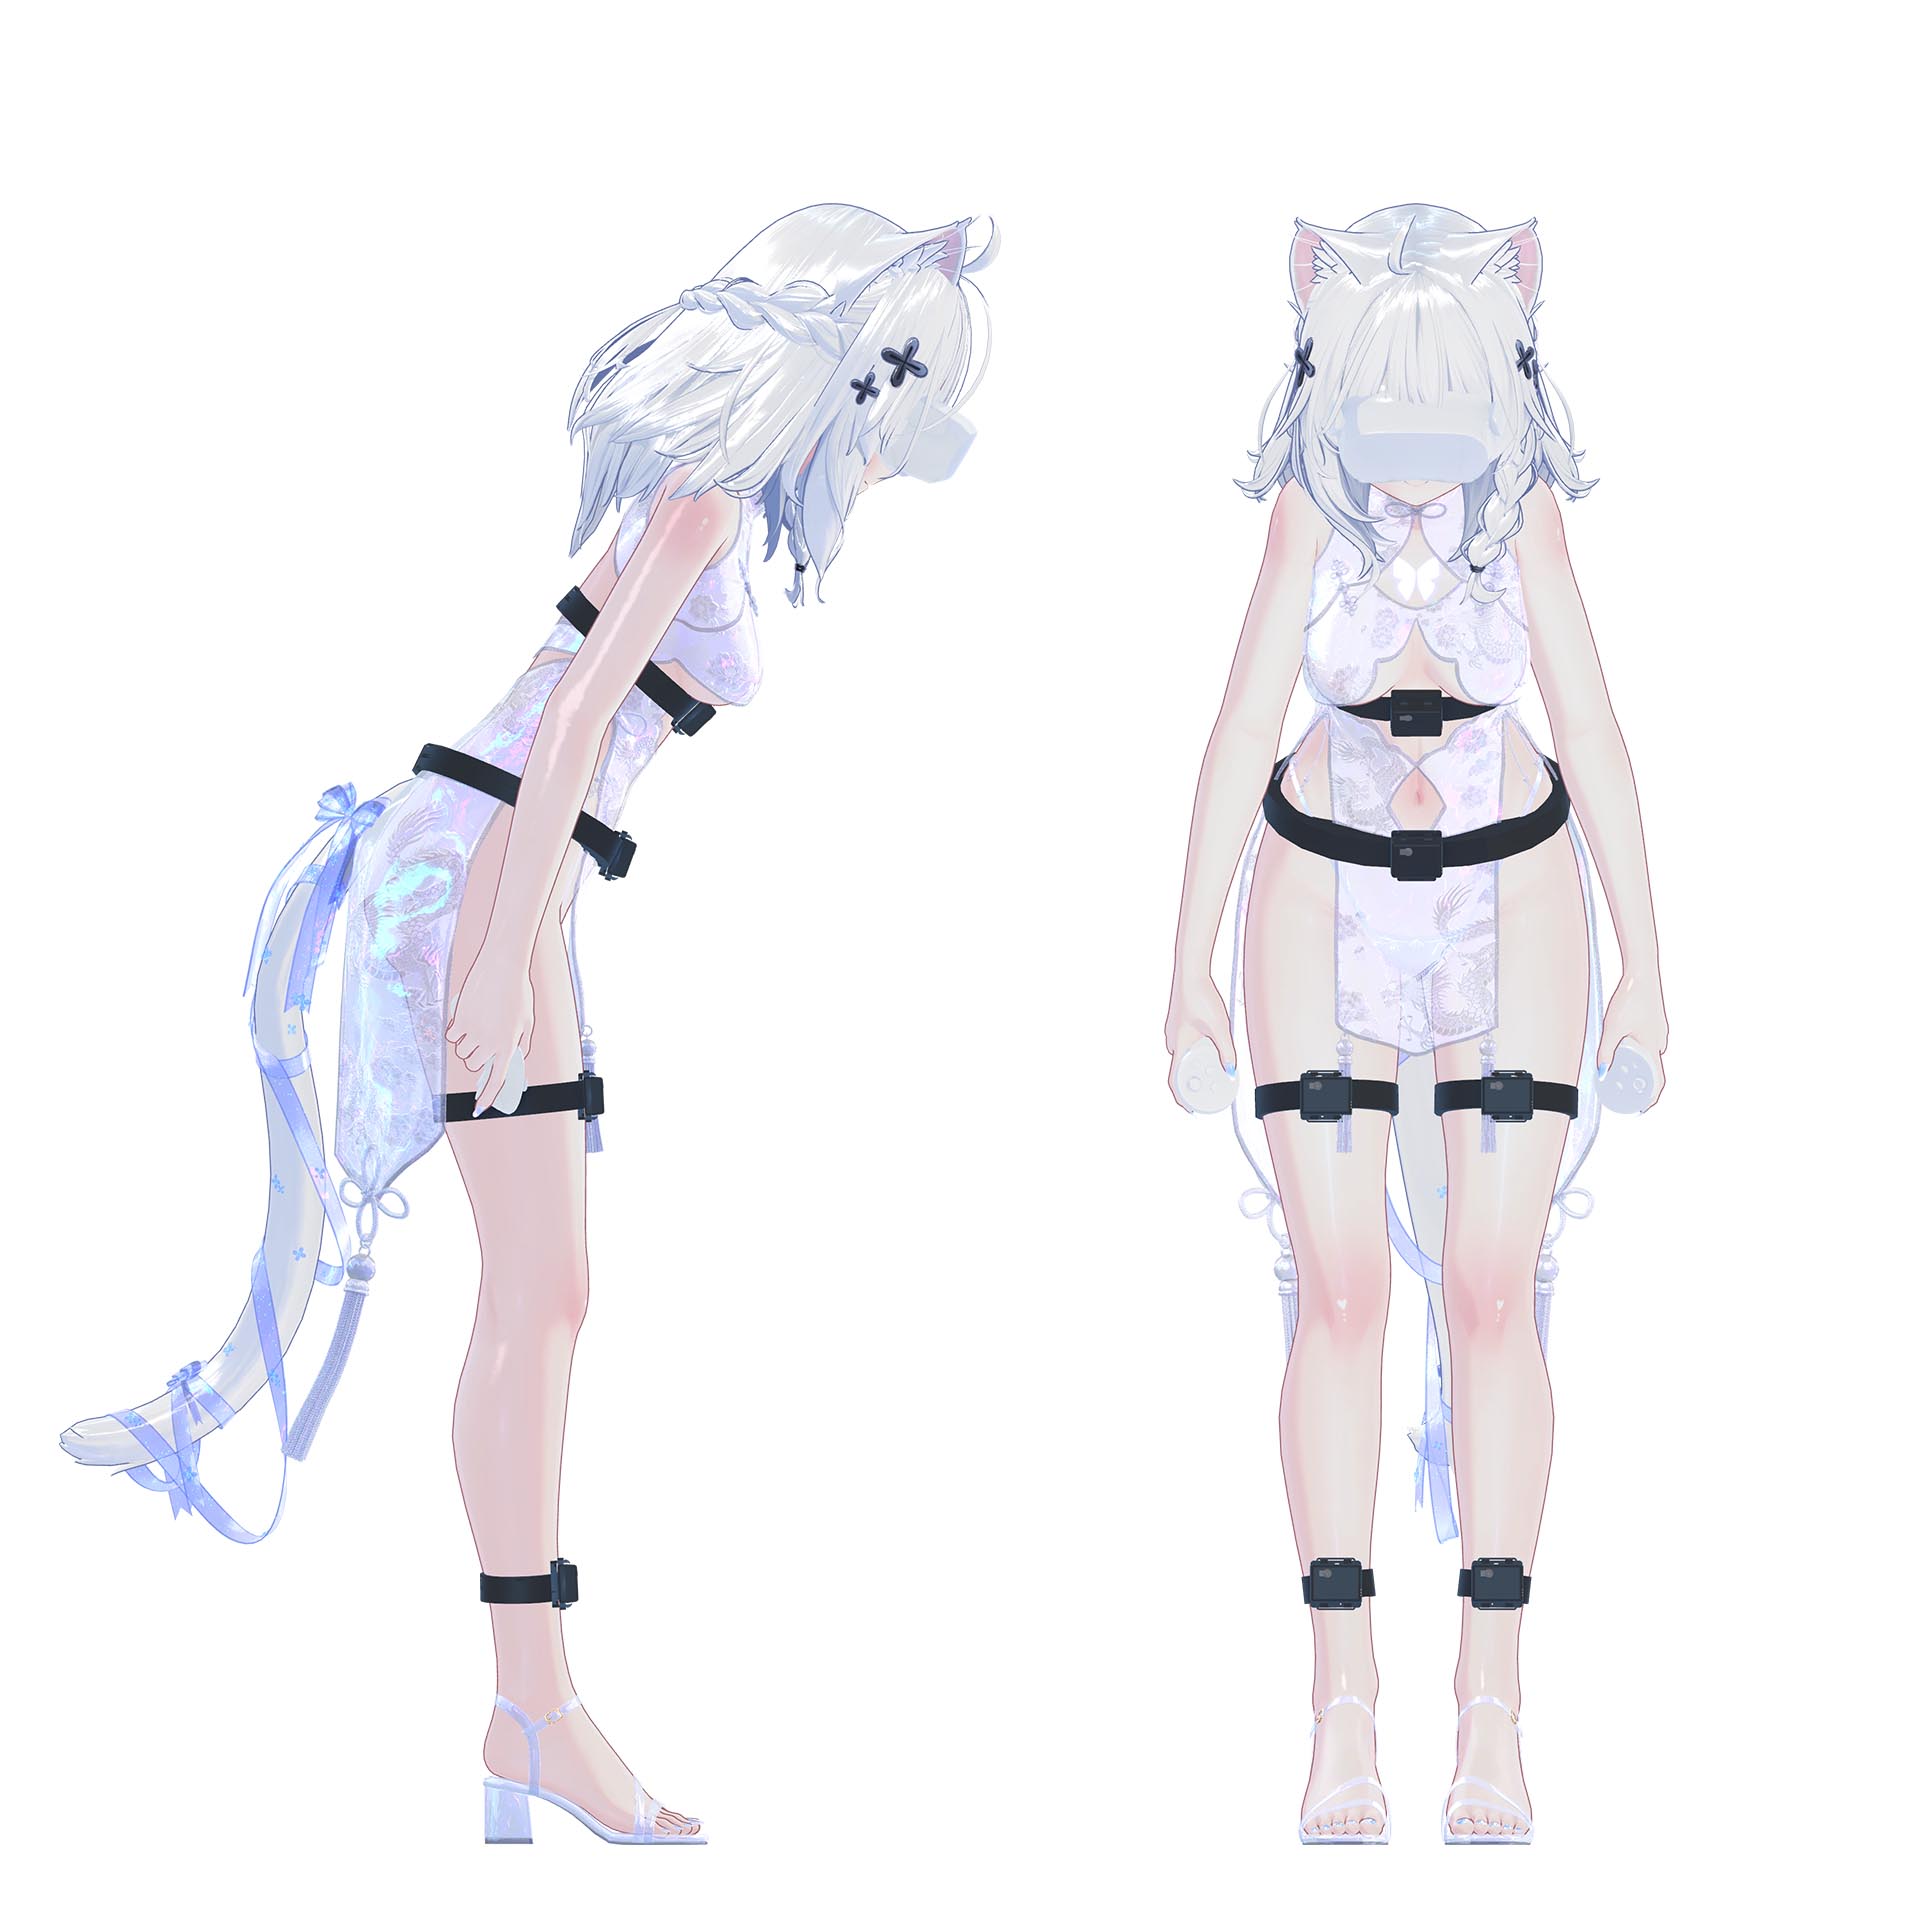
- Separate S pose bending into bowing posture for recording.
- This avoids body distortion caused by S pose
(commonly seen as the skeleton system tilting to the side after sitting down).
Enter game (example: VRChat)
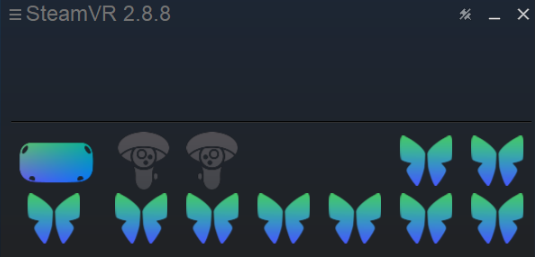
- After calibration is completed, you can see the refreshed butterfly logo in the SteamVR list.
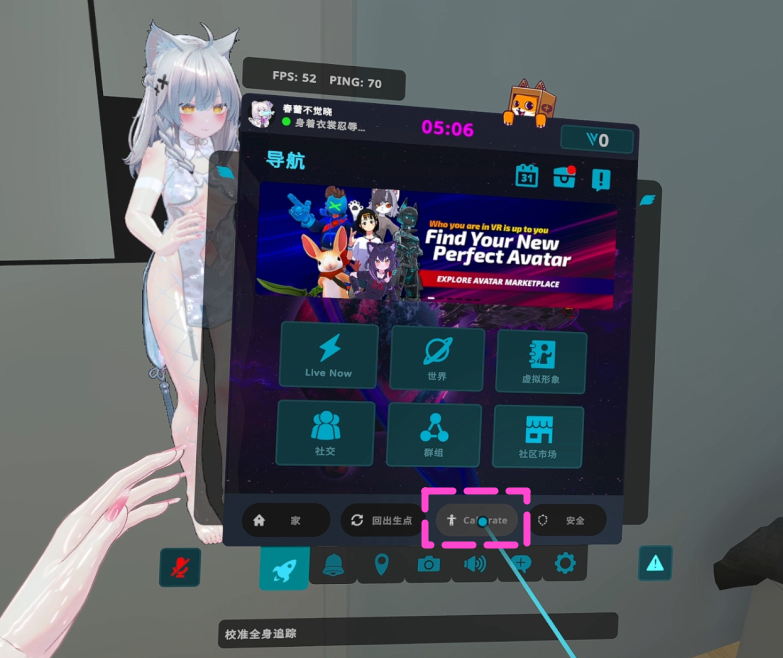
- Open the menu in the game, then click "Calibrate".

- Align the tracAlign the tracker points symmetrically on the character's body.
-They do not need to match perfectly, as body proportions vary for different avatars.
- Press the trigger button with the index fingers of both hands to complete the binding of tracker points.