UE Plugin Download
Below are the download links. For UE source code development, you can compile it yourself. Currently, the plugin is only applicable to the UE5 version.
UE Usage Instructions
Create a new project in UE
Both Blueprint and C++ projects are acceptable. If you need to further develop the plugin, you need to create a
C++project, import the character (the default pose of the character must beT-Pose, notA-Pose, otherwise the arm performance will be abnormal), then open the project folder, create a new folderPlugins folder, and then placerebocap_unreal_engine_pluginintoPlugins. For example, if you create atestV3project, the overall directory structure is as follows: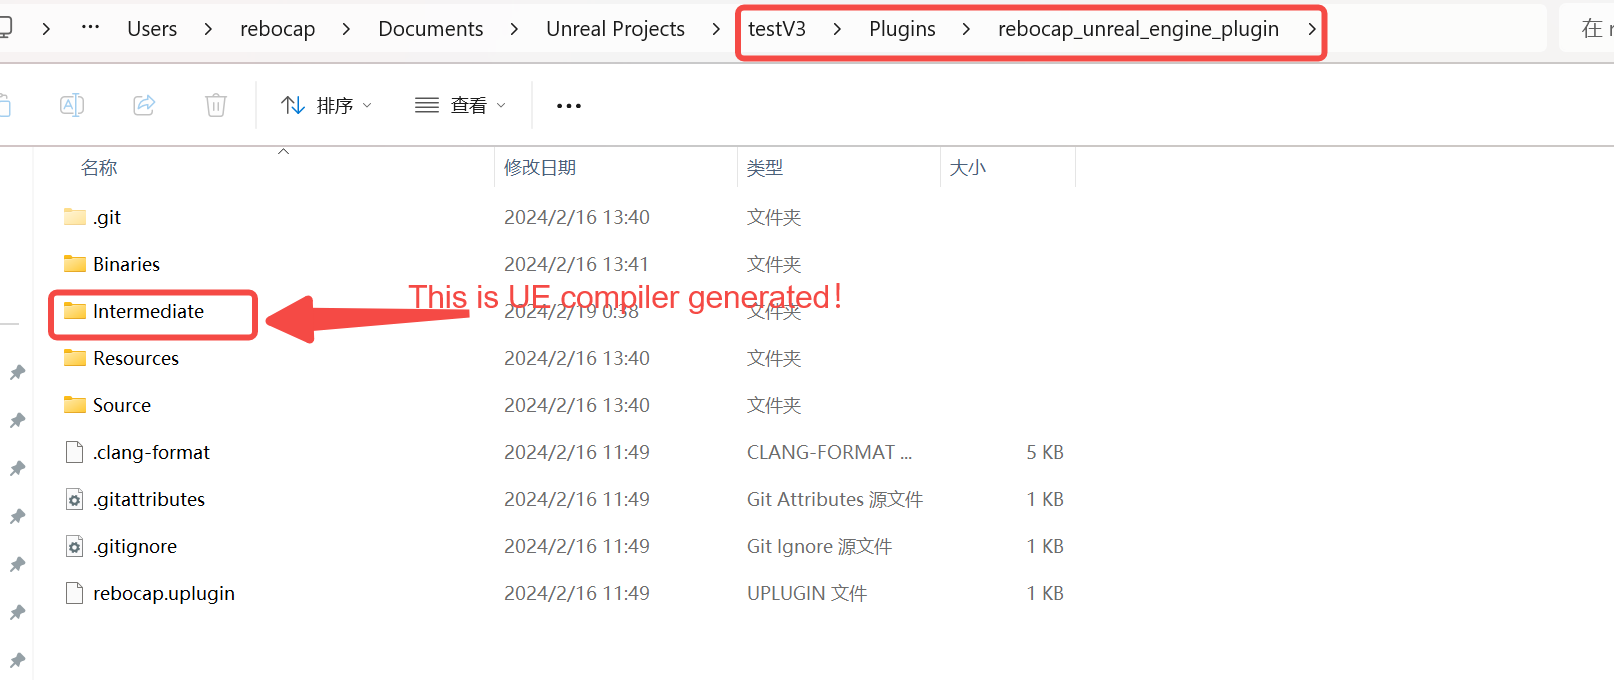
Reopen UE and it will automatically compile [the source code is released, so it should be compatible with all versions]
When further developing and debugging the plugin, you can use Rider to directly open
[name].uprojectfor development and easy debugging.You can use Rider to compile and check for compilation errors. If you use UE to automatically compile and errors occur, please check
Saved/Logs/[name].Log. TheLogoutput byUEgenerally has Chinese encoding issues, and you may need to adjust the system encoding toUTF-8to view it properly.Skeleton Binding Steps
- Click on the character asset Skeleton Mesh, right-click to create a new animation blueprint, and double-click to edit the animation blueprint. [If unclear, it is recommended to watch the video]
- Right-click to search for
Rebocap, selectRebocap Body Poseand create a node, and connect the small person on the right side of the node to theResultof the output pose. - In the lower left corner of the blueprint editing page, click the plus sign to create a new variable. The variable type needs to be searched, search for
Rebocap, selectRebocapMapData, class reference, then drag the variable into the nodeRetargetAssetjust created in the blueprint, and a variable node will be automatically generated. Then click the compile button in the upper left corner. - Click on the newly created variable node, then in the default value on the right, click the plus sign to create a new
Mapasset, which will automatically jump to a new page. On the new page, the user needs to fill in the skeleton mapping themselves. Note, it is recommended to fill in all 24 nodes, you can fill in according to the skeleton names ofAvatar.Skeleton names can be automatically selected by clicking the first light blue skeleton person in the top bar of the blueprint page to view the corresponding points of each skeleton. The 24 nodes in
Rebocapare standard human skeleton points, and the skeleton names inRebocapare named after the starting point of the skeleton bone. For example, inVRM, the bone namedLeftUpperLegstarts at the hip, so inRebocapit is namedL_Hip, the starting point ofLeftFootis the ankle, so the corresponding name isL_Ankle, andL_FootinRebocapcorresponds to the toe area. In the UE naming system, it is generally calledball.L Collarthe skeleton of the left shoulderL Shoulderthe skeleton of the left upper armL Elbowthe skeleton of the left lower armL Wristthe skeleton of the left hand palmL Handthe skeleton of the left middle finger [will not drive]If there are many skeletons, you can choose appropriate skeletons for mapping. For example, if there are 6 spines, you can choose three of them alternately.
- Return to the previously opened blueprint page (the selected skeleton mapping needs to be saved and compiled to take effect), and set the value of the variable node to the newly created
Mapasset. - Compile again and check for
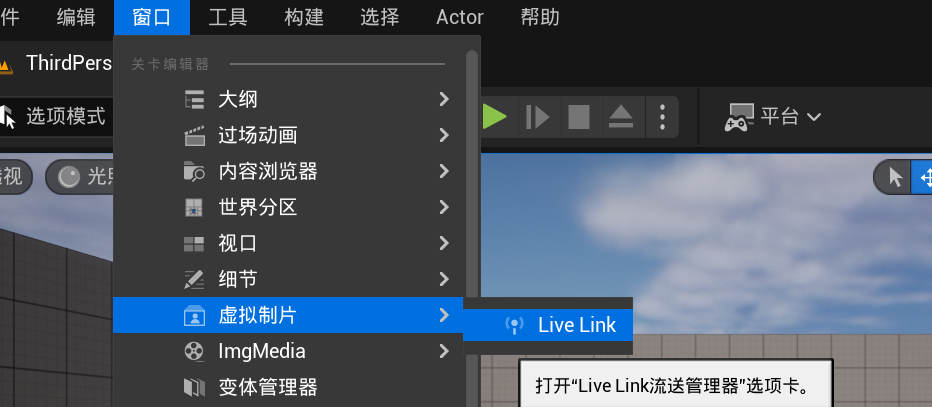
Warnings. Generally, there should only be 3Warnings. If there is an error in a skeletonmap, awarningwill indicate that a certain bone was not found. - Close the animation blueprint editing window, click on the top menu
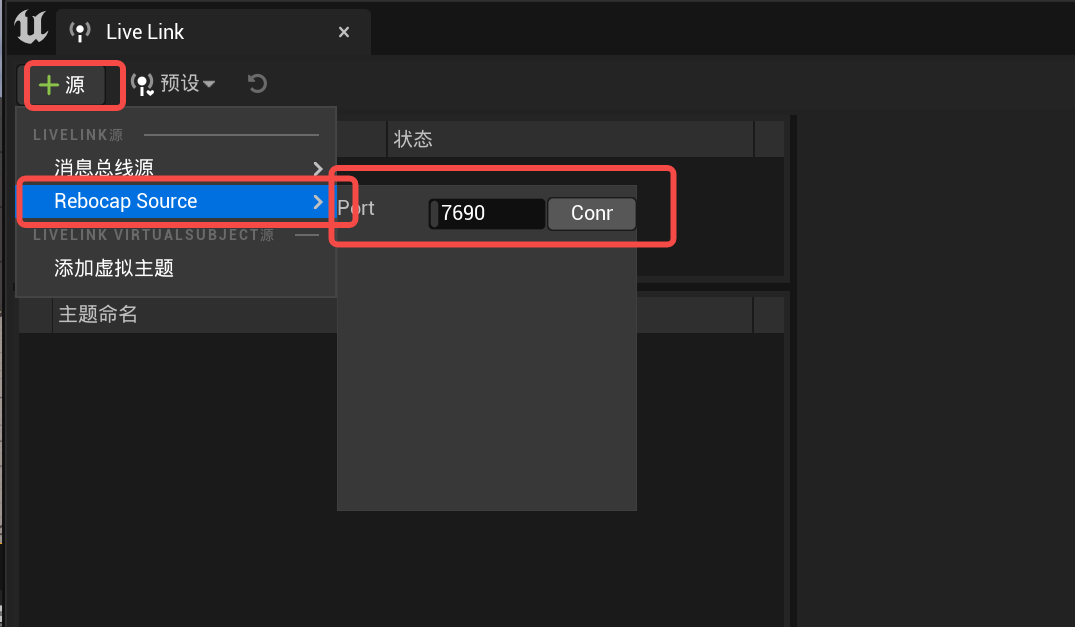
Window->Virtual Production->Live Link, then selectSource->Rebocap Source->conn[portis the port number, if the broadcast port number inRebocapis changed, it needs to be modified here]. If theRebocapclient is open,connectwill be in theokstate; otherwise, it will be in thebadstate. Additionally, the user will only start broadcasting data after motion calibration.
Code Description
The main motion control related code is in
Source\rebocap\Private\rebocap_pose_node.cpp, while other peripheral related code includesdllcalls andlivelink. TheInit_Foot_Vertices_And_SkeletalDatafunction is used to obtain the default skeletal position andvertpoints of the character, calculating six points on the soles of both feet for ground contact [6 points for each foot]. Since this is automatically calculated, it may not be precise enough; users can find the six points on the soles of their feet and pass them in for potentially greater accuracy.PS: Larger foot sizes may cause the character to bounce up and down. For an extreme example, if a character has 2-meter-long feet but is only 2 meters tall, when they tiptoe and land, if they need to keep their toes touching the ground, the character will definitely bob up and down.
Packaging Instructions
- Developers
For developers who need to package, you can download the latest version of the plugin (previous versions cannot run after packaging). The
runtimemode has addedLivelinkconnection management. You can refer to theConnectLiveLinkandDisconnectLiveLinkmethods in thePlugins/rebocap_unreal_engine_plugin/Source/rebocap_runtime/Private/RebocapLivelinkManagerDemoWidget.cppfile for implementation. If you need to disable the plugin's built-in UI, you can modifyPlugins/rebocap_unreal_engine_plugin/Source/rebocap_runtime/rebocap_runtime.Build.cs, comment out the macro definitionUSE_REBOCAP_LIVELINK_MANAGER_DEMO, and compile it yourself. Developers who place the plugin in their own projects are advised to add UI management forlivelinkconnections themselves. - Blueprint Users
Blueprint nodes have been added for managing
Livelink, with node names:Connect to Rebocap Livelink Source,Disconnect to Rebocap Livelink Source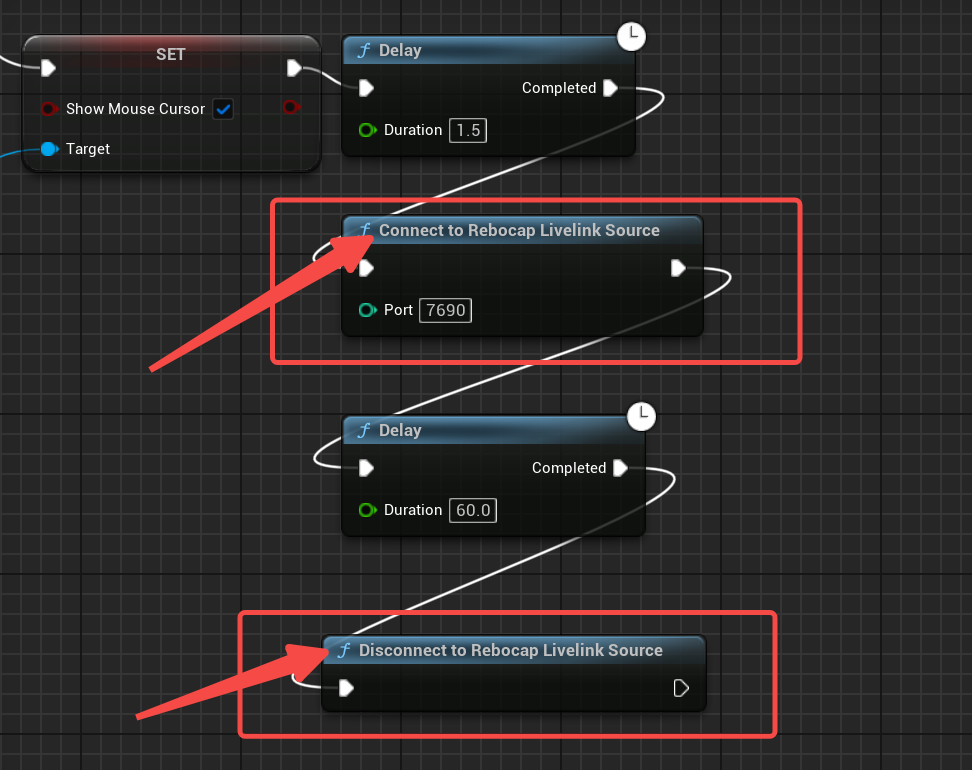
- Developers
Note:
- If you are using the
livelinkconnection in theEditor, it may cause thelivelinkchannel to be occupied, resulting in a failure to connect successfully ingamemode. It is recommended to restart theEditorand try again.- For
runtimemode (i.e.,standalone or game mode, which is running after packaging), since a method to obtain mesh vertices inruntimemode has not yet been found, the automatic skeletal registration does not include the soles after packaging, and the performance of the soles will be slightly worse than inEditormode. This issue will be addressed in the future.
Video Operation Demonstration
There is no sound here, as a temporary use, more will be added later.
Meta Human (or default Apose character) modified to TPose (APose to TPose conversion)
Note: The A-pose must match the official standard; otherwise, it is recommended to manually adjust the angles yourself. Convert the Apose to a temporary Tpose angle file and save it. For specific details, refer to the tutorial inside the compressed file below.