Hardware Configuration
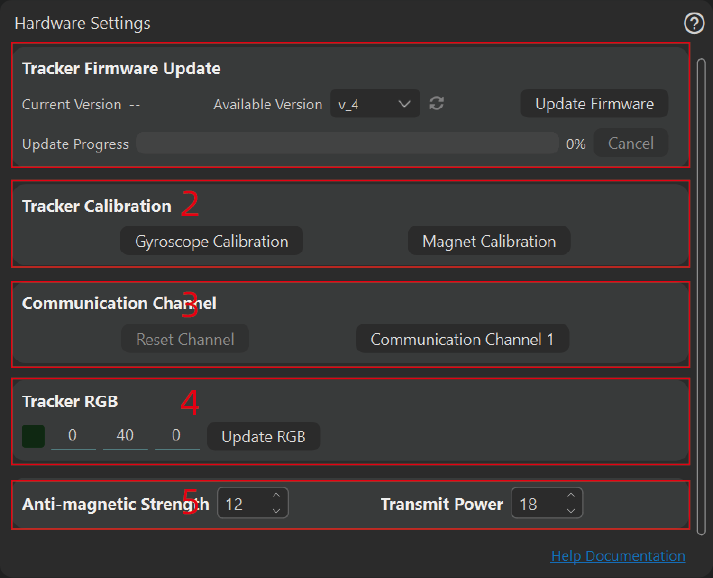
1. Firmware Update
- Current Version: The version number of the first lit tracker. If the versions are inconsistent, the log will display different tracker version information during calibration. If you purchased before December 2023 and haven't updated the firmware, the version number here might be confusing.
- Available Version: Fetches the available version number from the server to prevent issues with specific versions after release, allowing users to roll back. Currently,
previewonly has versionv4. Clicking the refresh icon on the right will fetch again. Update Firmware
Update the firmware to the selected version. Ensure that the connected trackers have sufficient battery and are all successfully connected, with 100% signal on the lower left side (signal quality fluctuations during the update process are normal). Below is the update progress display. After the update is complete, all lights will turn white. If an update error occurs or the RGB light is not white after the update, you can update again. After updating, you need to restart the tracker for it to take effect. You can restart by pressing the tracker's button or turning the tracker off and on again.
[info]Firmware updates can be repeated, but it is not recommended to continue updating if it is already updated successfully.
2. Receiver Firmware Update
- The update method and description are as mentioned above.
3. Tracker Calibration
Gyroscope Calibration
Gyroscope calibration is relatively simple. After lighting up the tracker, place it stationary on the ground to calibrate. Note that it must be absolutely still, with no vibrations, such as staying away from desktop computer cases (vibrations caused by fans in the case).
[info]Generally, gyroscopes do not need repeated calibration. If there is a significant temperature difference, calibration may be necessary. It is also recommended to calibrate when using 6-axis.
Magnetic Field Calibration
Magnetic field calibration is relatively cumbersome and time-consuming. However, understanding magnetic field calibration is essential!!!!!!
[info]Why Magnetic Field Calibration is Needed
Battery life will degrade with use, causing changes in the internal elements of the battery. During charging, a very small number of components may carry trace amounts of iron elements, which can also cause magnetization. Therefore, the magnetic field of the PCB circuit board itself may change. Magnetic field calibration is mainly used to eliminate the magnetic field carried by the sensor itself, which is referred to as magnetic deviation in the document.
[info]How to Determine if There is Magnetic Deviation (i.e., When Magnetic Field Calibration is Needed)
You can flip the sensor at a fixed point in space on six sides and observe the magnitude of the sensor's magnetic field value. If the difference is within 2uT, the magnetic deviation is generally small, or the relative magnetic field difference is within 0.1.
The chosen flipping point must be far from all magnetic field sources, such as magnetic wristbands, phones, computers, headphones, headsets, magnetic metals, etc.
How to calibrate the magnetic field:
- Place the tracker in the charging box, in an interval manner, with the charging contacts facing up. The charging contacts refer to the three yellow metal points on the tracker (i.e., the placement direction is opposite to when charging).
A maximum of 8 can be placed at a time, and they must be placed at intervals, with the charging contacts facing up, otherwise, the magnetic field carried by the box will be calibrated into the tracker!!!
- Do not place it on the table during calibration. It is recommended to calibrate at a fixed point in the air, i.e., try to rotate the charging box around a fixed point in space.
Note that even wooden tables often have iron screws or nails.
- A total of 6 sides. After clicking magnetic field calibration, be sure to rotate the box following the text instructions, trying to rotate at a uniform speed. The total of 6 sides, with each side's rotation time reserved for about 6 seconds, and switching rotation sides for about 1 second. Be sure to complete within the specified time, otherwise, it will affect the calibration effect.
In extreme cases, if only 3 sides are rotated within the specified time, the overall effect will deteriorate after calibration. You can refer to the above "How to Determine if There is Magnetic Deviation" to check the calibration results.
Below is a calibration video that you can view in advance. The rotation does not distinguish between clockwise or counterclockwise.
[info] Below is a demonstration guide video created in collaboration with community members. It is recommended to watch it in full for the first magnetic field calibration.
4. Communication Channel Modification
Most users do not need to use this, as the default communication channel is sufficient for most people. This mainly addresses the need for some users to use two sets of devices simultaneously in the same space.
For those with higher requirements, a commercial version of the software will be launched in the future, mainly targeting enterprises and multiple broadcasters interacting on the same stage. Along with free communication channels, it supports up to 10 devices in the same space. If there are higher customization needs, you can also contact us directly via email.
Function Description
- The left button is the reset channel button, which is the factory default communication channel. The right side offers selectable free channels, and frequent channel changes are not recommended.
- It is recommended to connect all sensors before modifying the channel; otherwise, trackers that have not had their channels modified will not be able to match with the receiver.
- If matching fails and you are unsure how to connect, you can use the charging box to reset the tracker channel. The receiver channel can be reset using the left reset channel button (if the receiver is already on the default channel, the left button will be unclickable).
Method to Reset Channel with Charging Box
Place the tracker in the charging box, keeping the direction consistent with charging, then click the charging box button to light up all trackers. Press and hold the charging box button for 8 seconds, then release. When the tracker's blue light flashes, press and hold for another 8 seconds and release. A green light flashing means the tracker in the charging box has successfully reset the communication channel.
If only the receiver cannot connect, please refer here
5. Update Tracker RGB Color
Update the RGB color on the tracker. If you want different trackers to have different colors, you can turn them on one by one and update. The icon on the left is a color example, but due to differences between RGB screen colors and actual light colors, the final RGB light color prevails.
[warning]Power Consumption Reminder
The higher the value in RGB, the brighter the light, and the faster the power consumption. The more lights there are, the faster the power consumption!!! For example, white light is the brightest and consumes power the fastest, resulting in the shortest battery life.
6. Update Tracker Magnetic Resistance and Signal Emission Power
- The magnetic resistance is generally recommended to be adjusted to 12 and not changed (the value range is 1~12). Other values may cause severe tracker jitter.
- The adjustable range for emission power is 1~18, where 18 corresponds to 9.1dbm and 1 corresponds to -8dbm. At 18, the emission power is greater. Generally, adjusting to 1 will affect communication distance, but the corresponding battery life can be extended by 1~2 hours.
System Configuration Panel
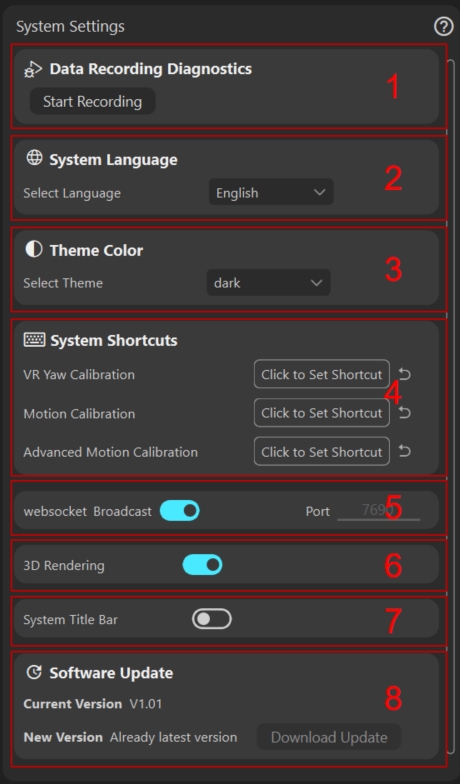
1. Data Recording Diagnosis
Used to provide feedback to rebocap developers with the original encrypted data of the actions, facilitating developers to diagnose issues based on the recorded actions and improve motion capture quality. By default, the system will automatically start recording data after action calibration, but it will not be saved. Users can click to start recording and then click to stop recording; the data will be automatically saved to the <rebocap_install_dir>/data/record_data/ directory.
2. System Language Selection
Select the language; the system will automatically choose the local language. If not supported, English can be used by default.
Note: Currently, other languages are automatically translated from Chinese. If there are any questions, feedback for improvement can be provided in the forum.
3. Theme Colors
The current version supports black and white themes, with the white theme still being improved and further enhancements planned.
4. System Shortcut Keys
Facilitates users to bind shortcut keys. Currently, it only supports operations under VR, with recording functionality to be added in the future.
After clicking, simply input the shortcut key on the keyboard to bind it. Note that it can only start with one of the following four function keys: win, ctrl, shift, alt, and supports a maximum of two function key combinations, which must be paired with a regular character, such as a~z.
5. WebSocket Broadcast
All SDKs, plugins, etc., use rebocap WebSocket broadcasting. If you wish to change the port number, you can close the broadcast, modify it, and then reopen it.
[danger]Port Occupied
If the default port 7690 is occupied, the port here will automatically increment by 1. If you find that the plugin cannot connect, check if the port number here has changed!!!
6. 3D Rendering Switch
Used to turn the 3D preview window on or off. Turning it off can save performance but is not convenient for motion capture debugging.
7. Use System Title Bar Switch
Using the system title bar may result in an overall style inconsistency, but performance will generally be slightly better.
8. Software Update
Function reserved, hot update feature not completed.