Manual Skeleton Adjustment
Manual skeleton adjustment is mainly for users who have higher demands for effects, aiming to make the skeleton closely match their own body for better overall results (specifically for PC users).
In PC scenarios, if you are directly viewing the preview effect, adjusting to your actual body size yields better results. If using in other software, it is recommended to upload the skeleton. If the uploaded real skeleton closely matches your own, the effect will be better.
In VR scenarios, especially for dancing users, adjusting the skeleton to match your own body yields better results. In other situations, such as wanting to resemble your own posture in sitting or static poses, a closer target skeleton is better, but the dynamic effect may relatively worsen! The optimal state is when the virtual character's skeleton and the real person's skeleton are consistent!
Impact of Inconsistent Skeleton with Your Own
For example: If the skeleton driving the character has noticeably longer arms, assuming the virtual character's hands reach the knee position, then when the real person's palms are together, if the virtual character needs to maintain the same posture as the real person, the positions of the left and right palms will significantly overlap.
For VR users, if the skeleton is inconsistent with their own, the greater the range of motion and the longer the duration, the easier it is to deviate. An extreme example is if the VR character's leg height occupies 9/10 of the entire body, and this character skeleton is uploaded in rebocap, then to keep the feet from slipping and the character height consistent with reality, if the real person steps 60cm to the right, the virtual character might step over 100cm (the virtual skeleton is much longer than the real person). If VR uses the real person's skeleton, but in VRChat uses this long-legged character, the problem is that the virtual character's leg movement angle is much smaller than the real person's leg movement angle. In VR, positioning relies on the tracker's position to infer joint angles.
VR Auto Height
Only effective in VR mode, click here to see the specific function
How to Adjust the Skeleton

Key Torso Skeleton Adjustment
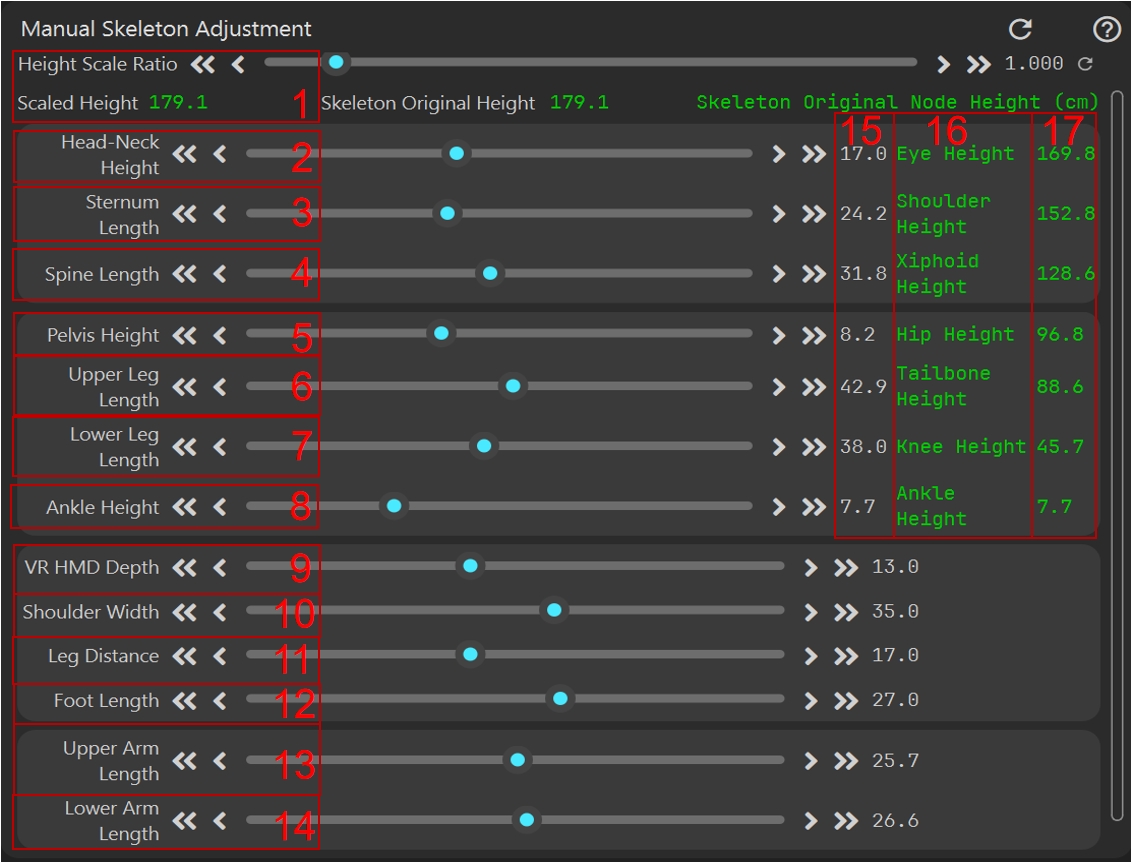
For users who do not wish to carefully adjust the skeleton, the default skeleton is a standard human skeleton with average dimensions. Adjust the slider marked as
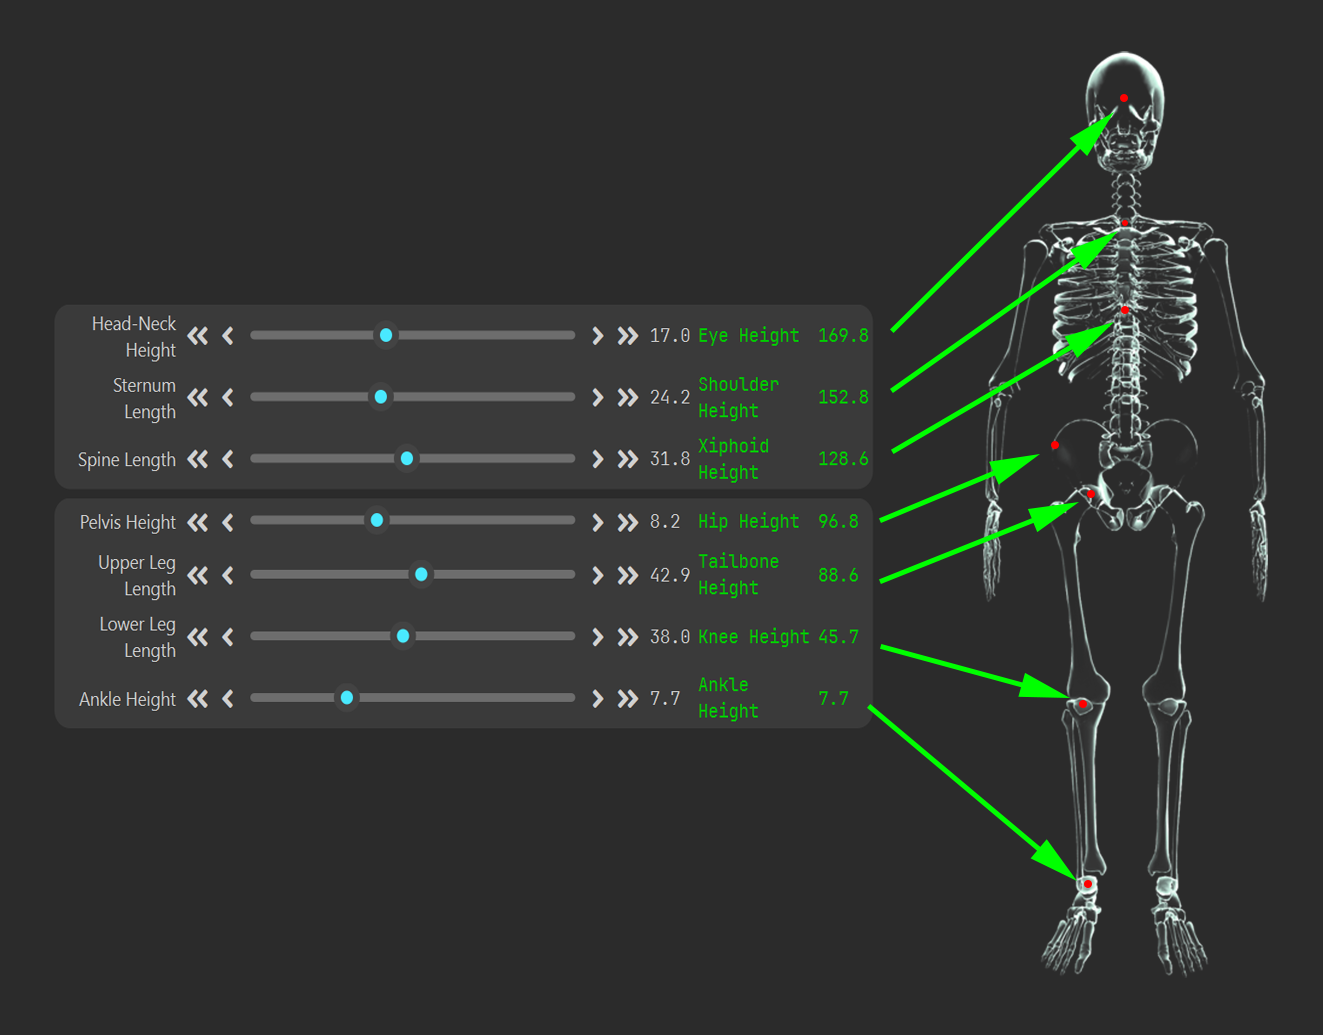
1in the figure below, which is the height scaling ratio. You can use the left and right buttons for fine-tuning, and the overall effect will not be too bad (the proportions of each joint will not change as a result).For users who wish to adjust the skeleton to match their own, you can refer to the figure below and adjust from bottom to top. The right side shows the key skeleton node positions of the character. You can adjust from bottom to top based on the calculated node heights. You can use a tape measure to measure the height of each joint relative to the body while standing, and adjust the skeleton lengths 2~8 based on the height information.

Figure: Torso Adjustment For VR users, if you wish to adjust the skeleton to match reality, you can refer to the above point 2 for adjustment. If you wish to adjust closer to the virtual character (do not enable VRC mode), each virtual point is at the middle height of the skeleton. Adjust based on this information. Of course, you can also upload a model skeleton yourself [although there is currently no fine-tuning capability based on uploaded skeletons].
Other Skeleton Adjustments
Other skeleton adjustments will not affect height. Mainly refer to the literal meaning on the left side of each adjustment. There are three points to note:
- Marked as
9, VR headset depth, adjustment needs to be based on headset wear. The best state is when the chest moves the least in a nodding state. - Marked as
11, leg spacing, this refers to the spacing of the upper leg root joints. If the character maintains a 90-degree angle with the ground, it can be considered as the midpoint spacing of the legs at this time. - Marked as
12, foot length, it is recommended that the foot length be smaller than reality because the toe joint will bend in reality, but currently rebocap does not have this joint, so it is generally recommended to measure the distance from the bend to the heel.
- Marked as
Manual Skeleton Adjustment Has No Effect
Please check if the skeleton import has been applied.
Skeleton Import

When to Use Skeleton Import
For users using the VMC protocol and Blender users, it is recommended to use skeleton import. For users of Reborn, Unity, and UE, the SDK will automatically register the skeleton, and generally, no secondary import is needed.
For VR users, if you want to resemble the target virtual character more in a static state without considering dynamic effects, you can use skeleton import. (Of course, if the current character skeleton is close to your own, you can also import it, and the dynamic effect will be relatively better). In VR, importing a skeleton will scale the entire skeleton based on height.
Advantages of Skeleton Import
Non-VR users importing skeletons will not experience foot slippage, but if the imported skeleton differs too much from their own, it can easily lead to unnatural leg switching while walking.
How to Import Skeletons
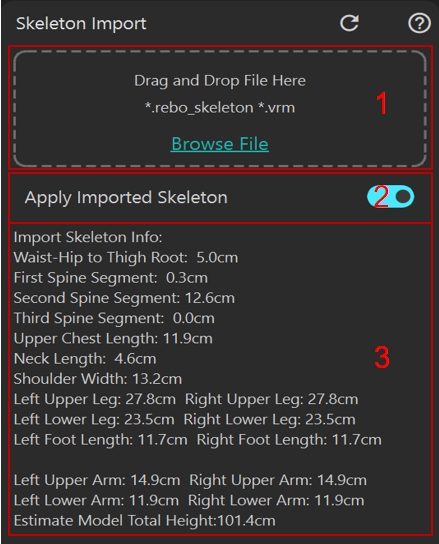
Currently, two formats are supported for import: a general VRM format character import and a skeleton .rebo_skeleton format file exported from Blender. For other formats, please import them into Blender yourself and then use the rebocap Blender plugin to export. For specific Blender plugin usage please refer here.
Import Skeleton Information Parsing
Parse according to the length of each joint. It is important to note that the total height of the model is estimated by multiplying the height of the neck node (which can generally be considered as the shoulder height) by a coefficient.
If you import a .rebo_skeleton skeleton, you may receive a prompt: Foot data not configured, standard model foot information will be used. Here is an introduction and explanation of the principle:
Foot data is mainly used for detecting foot positioning points (specific points can be found in the Blender plugin export documentation). For example, if you tiptoe, a virtual toe point here will be used to contact the ground. If you are uploading a character, it is best to use the mesh toe position of the uploaded character; otherwise, it may cause the toes to be suspended or below the floor. However, this impact is generally small. If the proportion of the character's foot length varies greatly and you want better foot performance, you can adjust these points in detail when exporting from Blender.