The fuzzy side of the strap should face the bottom of the tracker.
For users with smaller builds, if the strap is too long, moving the tracker near the buckle can significantly alleviate this issue.
For waist and chest straps, you need to first unbuckle the triangular side, then install the tracker onto the strap before fastening the buckle. See the video below for details.
Complex Tracker Installation Method
[info] Comparison Explanation
Compared to the common method, the complex method is more cumbersome and time-consuming, but it is more stable, with stronger force exerted by the strap on the tracker. The specific method is shown in the figure.
For waist and chest straps, when using the complex method, an additional auxiliary strap is needed. See the video below for details.
Quick Release Installation on Strap
Quick release is optional in mainland China (only for users with quick release)
Common Quick Release Installation Method
Key Points
The fuzzy side should face the bottom of the tracker.
The fuzzy side must be under the quick release, not directly against the tracker. The first image on the left is the correct example, and the corresponding second image is the incorrect example.
Similarly, for users with smaller builds, if the strap is too long, the tracker can be moved near the buckle to reduce the issue of the strap being too long, same as tracker installation.
For waist and chest straps, you need to first unbuckle the triangular side, then install the quick release, same as tracker installation.
Complex Quick Release Installation Method
[info] Comparison Explanation
Compared to the common method, the process is more cumbersome and takes relatively longer, but it is more stable, with stronger force exerted by the strap on the tracker. The specific method is shown in the figure.
For the waist and chest straps, you need to first unlock the triangular buckle and then install the quick release, same as tracker installation.
Recommended Strap Lengths for Different Body Parts
These are just recommendations and are not absolute. Everyone can adjust flexibly according to their own situation.
Strap Length
Body Part
100cm
Waist, Chest
60cm
Upper Leg, Head
40cm
Lower Leg, Upper Arm, Foot Sole
25cm
Lower Arm, Hand
Tracker Wearing Modes
After enabling AI Engine, it is recommended to bind the lower leg sensor about 5cm above the ankle.
PC Supported Modes
Full 15-point Wearing
Supports AI Engine (both models supported) and non-AI Engine
13-point Wearing (without foot sole)
Automatically switches to AI Engine and is the no foot model
Upper Body Mode
Both arms, chest, waist (optional), it is recommended to disable AI Engine
Single Arm Mode
A total of 3 points for one arm and the corresponding hand
6-point Full Body Mode
May be supported in the future, pending
VR Supported Modes
All VR modes support enabling AI Engine
VR Mode 10-point
6 points on legs, chest, waist, left upper arm, right upper arm
VR Mode 8-point
6 points on legs, chest, waist
VR Mode 6-point
Compared to VR 8-point, removes two foot sole trackers
VR Mode 5-point
Left upper leg, left lower leg, right upper leg, right lower leg, waist
VR Mode 3-point
Future support, under development
Adding Shoulder Nodes
You can replace the nodes on the hands to the shoulders, but the strap binding solution needs to be resolved by yourself. Currently, the official straps are difficult to support shoulder wearing.
In PC mode, under the full body 13-point wearing mode, future considerations may include adding a switch to replace the foot sole with the shoulder.
Specific Body Parts for Trackers
Introduction to Tracker Positioning Principle
Inertial sensor trackers are direction sensors, not position sensors, so any physical deformation will change the direction of the virtual skeleton. Our position is calculated based on the direction of each bone in the body and the length of the virtual skeleton, so the software cannot actually perceive the relative position of the node worn on the bone.
Recommended Tracker Wearing Positions
Currently, there are no recommended specific positions. Any position, as long as it is worn on the corresponding bone, can be calibrated and used for motion capture. However, the distribution of body types varies, leading to inconsistent effects in different positions. Therefore, wearing in different positions can result in significant differences in effect. Here, we only provide wearing guidance and explanations, and more experimentation is needed to understand the impact of different positions.
Principle explanation: Trackers are direction sensors, not position sensors, so any physical deformation will change the direction of the virtual skeleton. The core principles of wearing are as follows:
Trackers should align with the direction of the bone as much as possible, rather than changing with the body
. Avoid placing trackers in areas prone to physical deformation, such as muscles and easily deformable fat areas. For specific impacts, see Example Analysis of Deformation. Although there are compensation algorithms, it is strongly recommended to try better positions yourself to reduce the impact of physical deformation.
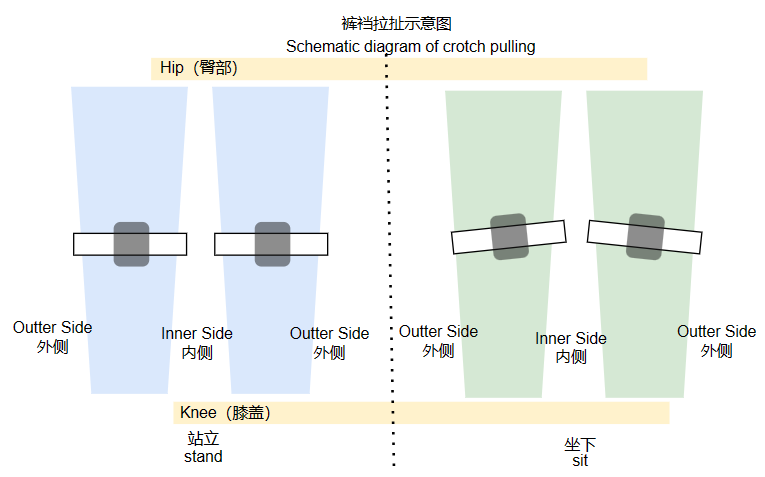
Avoid sensor direction deformation caused by strap pulling, such as wearing non-tight long pants, where sitting down can pull the strap and cause deformation, leading to severe virtual character leg crossing.
Avoid sensor direction deformation caused by breathing, such as wearing on the chest and belly.
Avoid sensors being suspended on the strap, such as on the waist and chest. If bound at the back, it can easily cause sensor shaking.
If not using advanced calibration, it is recommended that the top surfaces of the chest, waist, and head trackers be parallel to the front of the body, rather than placed on the side, either front or back.
Avoid ground friction on the foot sole strap, as this greatly affects the effect. If using a strap on the foot sole, it is best to be barefoot and place the strap in the foot sole recess, or when wearing shoes,
use shoelaces to secure the sensor instead of using a strap
.
[info] Main Points to Adjust and Test
Upper Leg Tracker: For some people, wearing the upper leg tracker about 5~8cm above the knee at the front is better, while others find wearing it on the sides of the upper leg in the middle position is better. Be mindful of the impact of pants pulling on the strap.
Foot Tracker: The stability of the foot tracker directly determines the overall tracking quality. Ensure that the foot sole tracker is not affected by strap pulling. It is recommended to use shoelaces directly to secure it. A simple method is to simply loop the tracker onto the shoelaces, as shown in the left image below. A more complex method requires securing the tracker or quick release to the shoelaces yourself.
Waist Tracker: The waist tracker is generally recommended to be placed at the back of the body (if used for sleeping, it can be placed at the front side of the body, then use advanced calibration). It is highly discouraged to place it on the belly.
Waist and Chest Trackers: Using quick release increases the center of gravity height. Relatively speaking, not using quick release is more stable. Additionally, using the complex binding method for straps is more stable.
Example of Simple Wearing with Shoelace Binding on Feet
Example Analysis of Deformation Cases
Since the thigh is relatively susceptible to influence, here are some analyses of affected cases for the thigh.
Special Note: The direction of the virtual skeleton is the same as the sensor's direction. If the sensor is tilted, the virtual skeleton will also tilt.
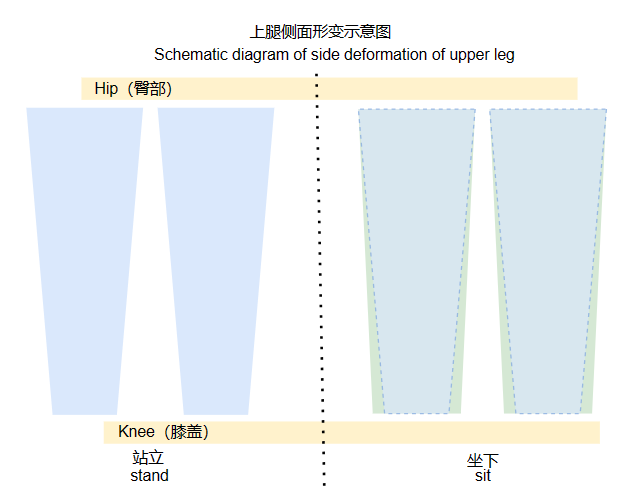
Taking wearing on the front of the upper leg as an example, in standing and sitting situations, the distribution of the human body will change. Normally, when standing, assuming there is a 20-degree angle between the tracker and the upper leg, after sitting, due to the influence of gravity, more body fat or muscle tissue will naturally sag, causing the angle to decrease. This varies from person to person, as shown in the figure below.
Figure: Illustration of body deformation when wearing on the front while standing and sitting
Illustration of crotch pulling when worn on the front
Figure: Illustration of deformation due to crotch pulling
Taking wearing on the outer side of the upper leg as an example, after sitting, due to the compression of the thigh bottom by the seat, body tissue may accumulate on both sides, increasing the angle between the sensor and the thigh bone, which can easily lead to crossed legs, as shown in the figure below.
Figure: Illustration of deformation when wearing on the side of the thigh
[info] Wide Strap
A wide strap with a width of 5CM (the official configuration strap is 2.5cm wide) can increase overall stability, especially for large movements, such as significantly reducing oscillations in the waist and chest directions.