Upper Leg Compensation
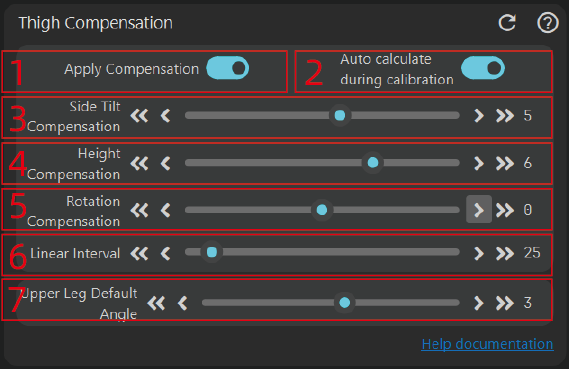
Apply Compensation
Enable the compensation function. This compensation is mainly used to offset deformations caused by body shape changes or strap pulling.
Auto Calculate During Calibration
Calculate based on the deformation during the S-Pose. For better results, it is recommended to adjust after sitting down and use manual adjustment. Due to changes in wearing position or uneven force caused by strap friction, the results of automatic calibration may vary each time.
Lateral Compensation
- This compensation is mainly used to offset lateral tilt caused by body shape changes when sitting or lying down. It does not compensate for issues caused by magnetic fields. Problems caused by body shape changes are usually symmetrical, and this compensation applies to both the left and right upper legs.
- For manual adjustment, you can sit down and open the 3D preview window to adjust. It is not recommended to adjust while looking at your tracker in VR.
- Some offsets may be caused by magnetic fields, please refer here
[info]Note!!!
It is recommended that users find the best binding position before adjusting compensation. The smaller the compensation value, the better. When testing binding positions, it is recommended not to wear long pants and to test with the strap directly against the skin (if some individuals are allergic to the strap's surface, a tissue can be placed underneath). Based on current feedback, some people find better results when placed on the outer side of the legs, while others find better results when placed directly above the knees. Please refer to the final test results!
Turn off compensation, then fully test the best binding position before enabling the compensation mechanism for better results.
Height Compensation
- Mainly used to compensate for leg height differences when sitting, such as when the left leg is higher than the right leg. For better results, it is recommended to manually adjust after sitting down until both feet are at the same height.
- There are two reasons for leg height differences:
- During A-pose calibration, the angles of the two legs are inconsistent (differences in left and right leg lengths can easily cause this), such as when the left knee is pushed back while the right knee is slightly forward, leading to leg height differences.
- Significant differences in muscle distribution between the two legs can also cause leg height differences.
Rotation Compensation
- The mechanism for rotation compensation is similar to height compensation, except height compensation is used to equalize the legs to the same value, while rotation compensation applies the same angle to both legs.
- Compensate after sitting down. The larger the compensation value, the higher the character's hip position will be.
Why this compensation is needed: Mainly because human body tissues exhibit a certain fluidity and are easily affected by gravity, especially when worn on the front. The relative alignment between the sensor and the skeleton can change. For example, after sitting down, the upper leg is parallel to the ground, and the hip and knee are at the same height. However, if you observe the virtual character closely, you may find that the virtual character's hip is lower than the virtual character's knee. At this point, you can adjust the compensation value to maintain consistency with reality.
Linear Range
The logic for calculating compensation. For example, if the compensation value is 10 and the linear range is set to 25 degrees, then when the thigh is slightly bent relative to the A-pose, and the bending angle is 12.5 degrees, the compensation value given is 5. If the bending angle is 25 degrees, the compensation value given is 10. If the bending angle is 90 degrees, the compensation value remains 10. In most cases, the linear range is 25~45 degrees. You can adjust it according to your situation.
Upper Leg Default Angle
This mainly modifies the angle between the real person's upper leg and the ground during calibration. The default is vertically downward with an angle of 0. This function is convenient for users with slight X-shaped or O-shaped legs or those who prefer a wider leg distance during calibration.
The larger the value, the more spread out the virtual character's legs will be. Note that this is different from lateral compensation; this adjustment will also take effect when standing. For the lower leg, based on experience, adjust to half of the upper leg's value.
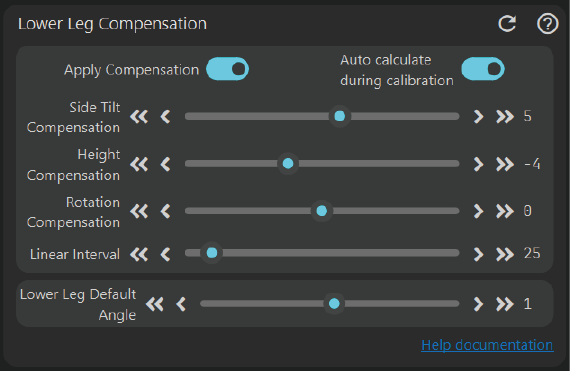
Lower Leg Compensation
The function is the same as upper leg compensation. For specific usage, refer to upper leg compensation. However, note that when sitting, the lower leg's deviation angle relative to the A-pose is very small, so compensation is generally not needed when sitting. You can check the compensation effect when the lower leg bends backward or when lying down.
IK, Shoulder, and Other Compensation
IK Parameters
The current IK is mainly used to recalculate the legs, enhancing leg stability and thereby increasing overall stability.
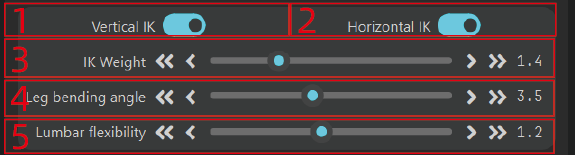
Vertical IK Switch
When enabled, it will minimize the vertical shaking of the character, although it cannot be completely avoided at present. Future offline optimization may address this issue.
Horizontal IK Switch
When enabled, if the character's feet remain stationary and there is angular movement in the legs and waist, the virtual character's feet will try to remain still simultaneously. Otherwise, due to different skeletons, only one foot may remain still while the other moves slightly.
IK Weight
The higher the IK weight, the greater the IK intervention strength. Lower values tend to maintain the original angles, and the speed of IK adjustment angle increments will be slower. You can compare the effect with IK turned off.
Leg Bend Angle
Increasing the leg bend degree expands the IK solving range, making the overall stability better. However, the default leg position will be bent, usually adjusted to around 3~4.
Waist Flexibility
The larger the value, the more flexible the waist movement will be, but it may differ from real-life movement. Adjust accordingly.
Arm Constraint Parameters
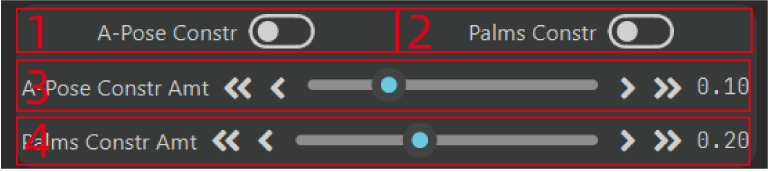
A-Pose Constraint
Mainly used to keep the A-Pose arms from getting too close to the body. This is designed for streamer users, because many streamer models have very narrow shoulders, and if the virtual arms match the real arms exactly, obvious clipping will occur. You can adjust the arm constraint range according to marker
3in the image; the larger the value, the farther the arms stay from the body.Clapping Constraint
Mainly used to adjust hand crossover when clapping. Because many virtual characters have very long arms, the virtual character’s hands will inevitably cross when a real person claps. This setting helps to alleviate, though not entirely eliminate, this issue. You can adjust the value of
4according to your actual situation; the larger the value, the greater the distance between the palms. It only takes effect when the palms are within shoulder-width range.
Shoulder Linkage
Shoulder linkage compensation is mainly used for compensation when there are no shoulder points. It automatically compensates for shoulder bone rotation based on the rotation angle of the upper arm, making the shoulders look less stiff. However, specific actions like shrugging cannot be compensated.
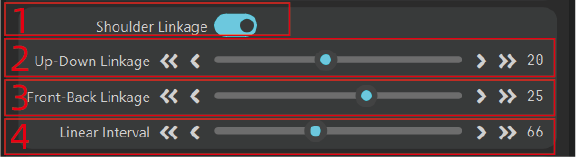
- Whether to enable shoulder linkage compensation
- Up and down linkage compensation value, i.e., linkage compensation when the arm is lowered and raised, with consistent compensation direction
- Front and back linkage compensation value, i.e., linkage compensation when the arm is moved forward and backward, with consistent compensation direction
- Linear compensation range, similar to the linear compensation range for the upper leg. Generally, setting the shoulder compensation range to 70~90 degrees is more appropriate. You can adjust it according to your actual situation.
Replacement Part Shoulder Sensitivity
This section is mainly used for sensitivity compensation when replacing the forearm or hand position to the shoulder. Due to the straps, the sensor on the shoulder often cannot fully follow the shoulder's movement, resulting in some displacement and less pronounced angle representation. Therefore, sensitivity is increased to compensate for the differences caused by the straps. If using a tight-fitting suit and the shoulder sensor is fully attached, set the sensitivity to 1.0.
The specific calculation logic is: Applied rotation value = Detected rotation value * Sensitivity

Others
Used to constrain abnormal rotations

Chest and Waist Tilt Constraint
This is mainly used to correct character tilting issues caused by strap misalignment. It is effective when standing and automatically corrects. However, if the character is sitting with a tilt, it may also correct, leading to tilting when the character stands upright. Note that bending the waist is not considered tilting; tilting refers to leaning to the sides of the body.
Correction is a real-time, gradual process that requires some time and only occurs when stationary.
Head Tilt Constraint
Similar to the chest and waist tilt constraint, considering that the head often naturally tilts, which can lead to incorrect correction behavior, it is not recommended to enable this.
Ankle Constraint
This mainly constrains the rotation of the ankle. Generally, the ankle has only one degree of freedom relative to the lower leg, with the other two degrees of freedom being smaller. Considering that the magnetic field conditions near the floor are often poor for most users, the ankle constraint is enabled by default to forcibly limit the other two directions. If the magnetic field environment near the user's floor is good, such as outdoors on land, the ankle constraint can be disabled for more freedom.
VR Chest Correction
The chest correction differs from the chest and lumbar tilt constraint, as it only applies in
VRmode. It is effective when the upper body is upright, lying flat, or prone (not effective when lying on the side). It adjusts the yaw angle to force the chest to straighten, which may result in slight chest rotation. When standing, it adjusts self-rotation, and when lying down, it adjusts left-right tilt. It is only recommended for use with 6-axis or when sleeping on a spring mattress.